
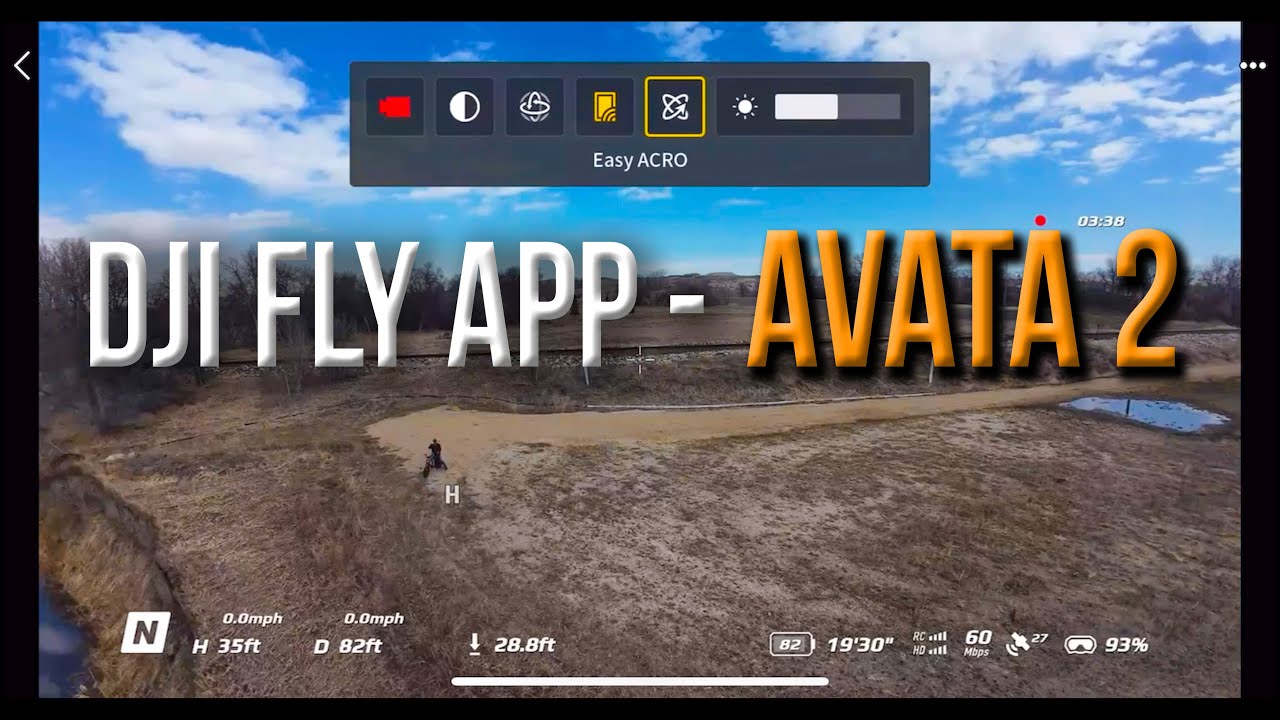
Hi everyone, Russ here from 51 Drones and today I’m going to do a no-frills walkthrough of the DJI Fly App for the brand new DJI Avata 2. Right off the bat, I want to show you that I’m using the Motion Controller and you can see we have that laser pointer right there. One of the coolest things added to the Avata 2 is the ability to control the settings with your Motion Controller.
Navigating the Menu with the Motion Controller
I’m just going to show you real quick how this works. If you go up to the top menu and then you pull the trigger, that’s going to pull down your top menu. Then you can click anywhere on the screen to exit. Go over here on the left hand side of the screen for your other settings. Click in the middle of the screen and then the bottom is your camera settings right there.
Now I just wanted to show you that with the Motion Controller, but I’m just going to use the navigation with my Goggles 3 to run through the menu because it’s a little bit easier to show you that.
Locking and Unlocking the Drone
I’m going to go ahead and unlock the drone right now. Right now I have it locked to lock the drone in place. You just push the lock button, which is the orange button on the Motion Controller, and that way you can move around the Motion Controller and navigate through the menu system. I’m going to go ahead and unlock that right now.
I’m just going to hold the Motion Controller and I’m going to use the button, the four-directional button on the top right side of the Goggles 3.
Top Menu Options
Let’s start at the top menu. I’m just going to scroll down from the very top and right there it says “Record”. As you can see, I am recording this right now and I’m recording both the drone view as well as the camera view.
If you go over, this is called “Enhanced Display”. I’m just going to push down on the 4D button and that’s going to give you just a little bit more contrast and brighten it up a little bit. I just like to go without Enhanced Display because that does drain your battery.
Right here is “Head Tracking”. I’m going to go ahead and engage that and show you what it does. As I move my head around, that yaws the drone back and forth. As you look down and up, that changes the gimbal position. You can’t steer the drone – you can’t move laterally or up or down or forwards or backwards, but you can yaw the drone and then change the gimbal position up and down. I’m going to go ahead and disable that right now.
You can see right here we have “Mobile Device Sharing”. I’m actually recording this on my iPhone – it’s streaming to my iPhone. That is really cool and really useful for screen recording.
Easy Acro Mode
Then if you go right here, this is called “Easy Acro”. You’ve probably seen that before, but I’m just going to show you real quick what it does. I can’t do that while it’s recording, so I’m going to go over here, hit stop on the record, and then let’s go back to Easy Acro. If you want to see all the details of how this works, go ahead and check out my full review, but I just want to show you the 180 drift.
We’re just going to scroll down with the scroll wheel and then we’re going to flip the joystick on the controller and then we’ll flip it. That’s basically 180 drift.
Let’s go down to flip, just like it sounds – flip. Let’s get a little bit further away here. You can also do a forward flip and a backwards flip. That’s what Easy Acro is – it’s pretty cool, especially for people that have no experience flying an FPV drone. It’s fun to get some of those moves.
Screen Brightness and Menus
You can adjust the brightness of your screen here. Let’s exit out of that one now.
Let’s go over to the left side menu. Here we see “Status” and it just shows you which drone you’re attached to, which one you’re connected to. If you had other drones connected at one point or another, you can fly the Goggles 3 and the Motion Controller with some other drones. Right now it’s just the Air 3 and the Mini 4 Pro. I imagine there will be more added in the future, but right now those are the three drones that you can use.
Let’s go down to “Album”. This is where you’re going to see all of your recordings in the goggles storage. This does not show you the recordings of your drone – it only shows you the goggles storage.
Right here is your “Transmission”. This is just going to allow you to broadcast, Focus mode, and then change your channel mode. I just leave these off and on auto.
As far as “Audience”, honestly I don’t know what that’s for yet. I plan to figure that out soon, but I can’t really let’s go ahead and just turn this on once. When you go to Audience, it doesn’t do anything, so I need to learn about that. I don’t know what that is, but as soon as I do know, I’ll add it to a future video on the Avata 2.
Safety Settings
Let’s go down to “Settings”. The first one is “Safety” and this is where you can set your altitude, your maximum flight distance, your return to home altitude. You can update your home point. Right there I just updated my home point to where the drone currently is.
When the drone is on the ground and not flying, you can calibrate the compass and the IMU. You can also calibrate the compass of the goggles and the IMU of the goggles right here in the safety settings.
Control Settings
Let’s go back out, go down to “Control”. Right here we are using the Motion Controller. You can change the settings a little bit.
Let’s go ahead and go into “Gain Tuning”. Right now, in normal mode, I have my maximum lateral flight speed at 1.1. Well, I’m going to change that. We’re going to go all the way up as high as it goes – 17.9. Then we’re going to go max vertical speed, same thing. We’re going to go 17.9. I’m not sure why these changed, because I did have these set up correctly before, so I don’t actually know what’s going on. Max backwards speed 17.9.
Then we’re going to scroll over to sport mode. Let’s go ahead and go down. Same thing – we’re going to change these to maximum. Actually, if you scroll straight up, that’s going to bring you down to the maximum of 17.9. Then go down to vertical 20. Forward speed, that one looks okay. Then backwards speed, we’re going to go to 35.8.
“Gimbal Pitch Speed” – you can change how fast the gimbal moves. You can change it to fast, normal, or slow. My recommendation – if you are new to this, leave it on normal. Slow is frustrating and fast is just too jerky, so leave it on normal all the time.
You can calibrate the gimbal when the drone is not in flight. You can set the units from imperial to metric right there, so meters and kilometers or miles per hour.
This is “Turtle Mode”. When your drone crashes, you can flip on Turtle mode. I’ll show you that in a YouTube short or another video, how Turtle mode works. And we got the seagulls coming in, my favorite animals.
You can do a goggles tutorial right here if the drone is not flying. You can also engage a beginner mode. This is going to limit your speed and your altitude. So for someone that’s never flown before, beginner mode is recommended, because it allows you to fly comfortably without having to worry about going too fast or crashing into something. Beginner mode is very useful for brand new drone pilots.
Camera Settings
Let’s go down to the camera. This is where you can change the aspect ratio from 4:3 or 16:9. Right here are your video quality settings – lots of different choices on the Avata 2. Right now I have it at 4K60 and I always leave it on 4K60.
You can change your camera field of view from ultra-wide to wide to normal. You’re not going to see any difference in your goggle view, but in the recordings you’re going to see that different field of view as you change these.
Right here you can change your stabilization from RockSteady to HorizonSteady. Basically, RockSteady is going to keep everything nice and smooth – everything looks really nice. It’s also going to add that horizon tilt and things when you’re flying. But if you want to keep the horizon steady and just have that straight horizon all the time, you’ll switch it to HorizonSteady. And if you are skilled at using your own stabilization software, you can turn both of these off and then you can stabilize the footage yourself if you prefer to do that.
Right here you can set the auto ISO limit. I just leave this at 6400 all the time. You can turn on grid lines if you want to use grid lines to figure out the center of your screen. Let’s go ahead and see here – there we go. So we got the grid lines. You can see rule of thirds, you can see the center of the screen and things like that. Let’s go back here. Oh my gosh, got a little push happy! I’m going to turn my grid lines off right now.
You can set a center point if you want to. Right here it shows you how much storage you have on the SD card. You can also change the storage to internal storage, so it will store your videos and your photos on the drone, which is awesome. 46 GB of internal storage – so happy that they brought us that. You can format the SD card right there.
Right here are “Advanced Camera Settings”. You can set it to record both the aircraft and the goggles, or one or the other when you hit the record button. Here’s the camera view recording – you can turn that on or off. Here’s the auto record on takeoff, so as soon as you launch the drone, it’s going to start recording.
Right here is where you can choose D-Log M, so a flat color profile. If you like to change how your footage looks and kind of fine-tune it, you want to shoot in D-Log M.
Right here you can change the sharpness of the footage. I like the sharpness of the Avata 2 footage, but one thing that I do recommend is change your noise reduction and put this at a -2. Noise reduction right there to a -2.
Anti-flicker – just leave that on auto. Don’t put your video subtitles on. I don’t know why you’d ever want to do that. And that is your advanced camera settings. You can reset all the camera parameters right here to the default, and that is it on the settings there for the camera.
Display Settings
Here’s the display. You can change the brightness of your display. Let’s go ahead and way up – that’s going to really drain your battery life, so I leave this one on 3.
You can change the scaling. Not sure if this is going to show up on my recording, but you can shrink it just like that so it adds a black bar around it. Now this is useful for people who have trouble seeing the corners in your goggles, the corners of the frame. If you want to narrow it down a little bit, you can do that. So I’m going to go back to 100%.
You can show where the home point is, so how to have a little H on the screen. And here’s the “Goggles Defog” – what this does is it turns on the fan into like hyperdrive. Let’s go ahead and turn that on. You might be able to hear that – basically it turns the fans on so it keeps the inside of your goggles from fogging up.
“Real View 2D” – not actually sure what that is, so sorry about that one. And then “Enable Real View Picture-in-Picture”. This is where you can tap on the right side of your goggles and it’ll show you that pass-through. It’ll use those front cameras on the Goggles 3 and so you’ll be able to see both your drone as well as what’s in front of you. I do like the concept, but I don’t like the very narrow field of view on that and I discussed that more in my full review.
Right here it just gives you all the information about your drone, the batteries, your software and everything like that. So if you want to check the firmware on everything, it’s right there.
Bottom Menu – Camera Settings
We’re going to back out, we’re going to come up from the bottom, and right here are your camera settings. You can switch from photo to video mode right there. Right here is where you switch from auto to manual mode.
But I was going to show you in auto mode, you can still adjust your exposure, just like that. So you can make it darker, you can make it brighter. You can also adjust your white balance. Right now I have it set to auto white balance. You can change your aspect ratio from here, from 16:9 to 4:3. You can also change your video quality, you can change your field of view, you can change your ISO limit, your stabilization, you can choose D-Log M right here. So you can do a lot of different things in auto mode.
Then if you switch this over to manual mode, then you have the ability to adjust everything. So you can change your shutter speed right here. Let’s speed that up a little bit, maybe one more, probably go one over 1/1600. And then your ISO – you can adjust that as well. You can adjust your white balance and then all the other things that you could set before in auto mode. I’m just going to go ahead and set this to auto mode again. There we go.
On-Screen Information
And there are all of your settings for the Avata 2. Let’s just take a real quick look at the screen here. Right now I’m in normal mode. I’m going to push the mode button on the Motion Controller – that’s going to put us in sport mode and that’s going to allow us to go about 37 mph versus 18 mph.
You’ll see the height that your drone is at from the launch point, as well as the distance from your launch point. It shows you your speeds right there, both vertical and horizontal speeds. It shows you the distance from the drone to the ground – so about 18 feet right there. It shows you you’ve got 26% battery life, so that’s going to start beeping at me pretty soon.
It shows you the length of your flight right now. So we’re at 5 minutes. I know it’s been longer – oh, it shows you 5 minutes left, I’m sorry. So it’s counting down 5 minutes. It shows you the connectivity of the RC, as well as the signal transmission to your goggles. So that’s really good – both got all the bars there. 60 megabits per second is our bitrate coming in. We got 29 satellites locked on. We have 87% battery on the goggles.
Then on the far upper right hand corner there, you’ll see that I got about an hour and a half left on the memory card on the drone and about 4 hours left on the goggles battery life.
Final Thoughts
So that is the walkthrough of the user interface and the settings for the Avata 2. If you have any questions, let me know down in the comments and I’ll answer them to the best of my abilities. Really appreciate you guys watching this one as well as my full review.
This is one of the most fun drones that I have ever flown, you guys. It’s so much fun. People make fun of me – a lot of my friends make fun of me for using this Motion Controller. But I’ll tell you what – the reason I’m really fired up about this drone is because of how fun it is to fly. I don’t care about like having all the perfect settings and having all of the just everything be professional. Honestly, you guys, with this drone, I don’t care about it. All I care about is having fun, and that’s why I like to use the Motion Controller. If you like fun, then get the Avata 2 and fly it with the Motion Controller. And if people want to make fun of you, then that’s on them, man.
Alright, thanks for watching everybody. You have a great day and as always, fly safe and fly smart.


+ There are no comments
Add yours