


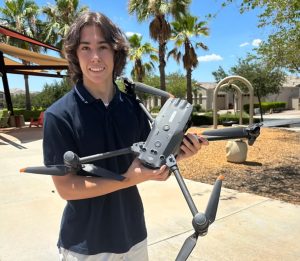
What is up guys, welcome back to another video! Today I have a quick one for you and I want to talk about the best cinematic settings that you can use if you want to extract the most out of the brand new DJI Avata 2. Let’s get started!
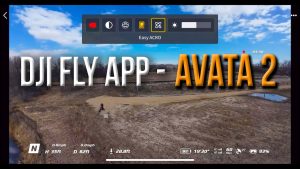
Frame Rate and Resolution on DJI Avata 2
Now starting out first with the frame rate and resolution – the highest resolution that you have on the Avata 2 is 4K and I would advise you to always shoot in that. When it comes to frame rate, 60 frames per second is ideal. If usually you’re shooting in 30 frames per second, then I would advise you to shoot in 60 with the Avata 2. That way you can play back your 60 frames per second footage on a 30 frames per second timeline. It will be very smooth and there won’t be any problems with that.
Screenshot
” data-medium-file=”https://dronexl.co/wp-content/uploads/2024/04/Frame-Rate-and-Resolution-on-DJI-Avata-2-1000×568.jpg” data-large-file=”https://dronexl.co/wp-content/uploads/2024/04/Frame-Rate-and-Resolution-on-DJI-Avata-2.jpg” src=”https://dronexl.co/wp-content/uploads/2024/04/Frame-Rate-and-Resolution-on-DJI-Avata-2.jpg” alt=”Frame Rate and Resolution on DJI Avata 2″ class=”wp-image-43850″ title=”DJI Avata 2 – BEST Settings For Cinematic Drone Footage 2″ srcset=”https://dronexl.co/wp-content/uploads/2024/04/Frame-Rate-and-Resolution-on-DJI-Avata-2.jpg 1966w, https://dronexl.co/wp-content/uploads/2024/04/Frame-Rate-and-Resolution-on-DJI-Avata-2-1000×568.jpg 1000w, https://dronexl.co/wp-content/uploads/2024/04/Frame-Rate-and-Resolution-on-DJI-Avata-2-768×436.jpg 768w, https://dronexl.co/wp-content/uploads/2024/04/Frame-Rate-and-Resolution-on-DJI-Avata-2-1536×872.jpg 1536w, https://dronexl.co/wp-content/uploads/2024/04/Frame-Rate-and-Resolution-on-DJI-Avata-2-150×85.jpg 150w” sizes=”(max-width: 1966px) 100vw, 1966px”>
But if you want to, you can always have that flexibility to slow down your footage to half speed and use that in your project without having to really think about it. So 4K at 60 frames per second is what I would recommend. Personally, I shoot in 50 frames per second because usually I shoot all of my projects in 25 frames per second, but this is just the European standard. I know for a fact many people prefer the look of 30 frames per second. If that’s you, then yeah, 4K at 60 fps is what I would advise you to go for.
Screenshot
” data-medium-file=”https://dronexl.co/wp-content/uploads/2024/04/DJI-Avata-2-BEST-Settings-For-Cinematic-Footage-2-1000×560.jpg” data-large-file=”https://dronexl.co/wp-content/uploads/2024/04/DJI-Avata-2-BEST-Settings-For-Cinematic-Footage-2.jpg” src=”https://dronexl.co/wp-content/uploads/2024/04/DJI-Avata-2-BEST-Settings-For-Cinematic-Footage-2.jpg” alt=”DJI Avata 2 – BEST Settings For Cinematic Drone Footage 1″ class=”wp-image-43853″ title=”DJI Avata 2 – BEST Settings For Cinematic Drone Footage 3″ srcset=”https://dronexl.co/wp-content/uploads/2024/04/DJI-Avata-2-BEST-Settings-For-Cinematic-Footage-2.jpg 1948w, https://dronexl.co/wp-content/uploads/2024/04/DJI-Avata-2-BEST-Settings-For-Cinematic-Footage-2-1000×560.jpg 1000w, https://dronexl.co/wp-content/uploads/2024/04/DJI-Avata-2-BEST-Settings-For-Cinematic-Footage-2-768×430.jpg 768w, https://dronexl.co/wp-content/uploads/2024/04/DJI-Avata-2-BEST-Settings-For-Cinematic-Footage-2-1536×859.jpg 1536w, https://dronexl.co/wp-content/uploads/2024/04/DJI-Avata-2-BEST-Settings-For-Cinematic-Footage-2-150×84.jpg 150w” sizes=”(max-width: 1948px) 100vw, 1948px”>
DJI Avata 2 Color Profiles
The next thing we need to talk about is color profiles. I would always advise you to shoot in the flattest color profile available on any drone, and in this case it’s D-Log M on the Avata 2. There is a massive difference between the D-Log M footage and the normal color profile footage. The normal color profile footage gives you a baked-in result with all that sharpness added, with all of that detail added, and you don’t really have the freedom to play with it or to change the colors or any of the information, because it’s already baked into the file that you’re getting on your SD card.
Whereas with the D-Log M footage, you’re ending up with footage that is very flat, but it retains a whole bunch of information about the highlights and shadows. You have a lot of tweaking that you can do in post if that’s something that you prefer to do. You can always play with that and really emphasize the colors that you want. You have a lot of freedom to explore different creative choices when it comes to how you want to color grade your footage. For me, this is what makes the footage interesting, this is what makes it pop, and this is what makes it cinematic as well.
Many people who are still new to color grading are kind of intimidated by it, but it’s really easy. There are literally hundreds of free tutorials, free LUTs available, free courses – everything that you need to know about color grading is free and you can find it not only on YouTube but online everywhere. You can gain a lot of knowledge about this aspect which is, at least for me, very important on how to make your footage look cinematic.
I have some LUTs available for the D-Log M color profile on the Avata 2, which of course you’re not obliged to check out, but if you want to have a ready-to-use solution which will help you color grade your footage in a matter of seconds, you can check it out down in the description below. If not, you can just color grade your footage yourself. You can add some contrast, play with the shadows and the highlights, and just tweak it a little bit so you can see the difference that it makes as opposed to having a baked-in normal color profile footage.
Manual Camera Settings
Now the next thing is to lock your settings into manual mode. With FPV it’s very intimidating to lock your settings because you’re always moving, you’re always changing the different angles and perspectives, and there are always different sources of light. Sometimes locking your settings is not ideal because it will just mean that sometimes you’ll have footage that is a little bit too dark or a little bit too overexposed. But with the DJI Avata 2, there is a workaround for this and it’s really easy to use.
Screenshot
” data-medium-file=”https://dronexl.co/wp-content/uploads/2024/04/DJI-Avata-2-Manual-Settings-for-Camera-1000×568.jpg” data-large-file=”https://dronexl.co/wp-content/uploads/2024/04/DJI-Avata-2-Manual-Settings-for-Camera.jpg” src=”https://dronexl.co/wp-content/uploads/2024/04/DJI-Avata-2-Manual-Settings-for-Camera.jpg” alt=”DJI Avata 2 – BEST Settings For Cinematic Drone Footage 2″ class=”wp-image-43851″ title=”DJI Avata 2 – BEST Settings For Cinematic Drone Footage 4″ srcset=”https://dronexl.co/wp-content/uploads/2024/04/DJI-Avata-2-Manual-Settings-for-Camera.jpg 1603w, https://dronexl.co/wp-content/uploads/2024/04/DJI-Avata-2-Manual-Settings-for-Camera-1000×568.jpg 1000w, https://dronexl.co/wp-content/uploads/2024/04/DJI-Avata-2-Manual-Settings-for-Camera-768×436.jpg 768w, https://dronexl.co/wp-content/uploads/2024/04/DJI-Avata-2-Manual-Settings-for-Camera-1536×872.jpg 1536w, https://dronexl.co/wp-content/uploads/2024/04/DJI-Avata-2-Manual-Settings-for-Camera-150×85.jpg 150w” sizes=”(max-width: 1603px) 100vw, 1603px”>
First of all, you need to swipe up from the goggles and enter manual camera settings. Then select the ISO that you want to use. Personally, I would advise you to shoot at 100 ISO, but if you know that there will be a lot of instances where you will be flying from a place that is a little bit brighter to a place that is a little bit darker, you will need some flexibility with the ISO. So you can either set it to 100 for example, or you can set it to Auto and then we will lock it later with one more setting.
Let’s just say leave ISO to Auto. Go to shutter speed and just set it to double your frame rate. So if you’re shooting in 4K at 60fps, set your shutter speed to 1/120. Then go and select your white balance, which I personally always set to Auto. Then I take a look around with the drone, make sure that the camera sets the proper white balance that really fits the specific environment that I’m in. When I see what the Auto value is, then I go ahead and lock that exact value into my manual white balance. That way I know it will stay exactly like it’s supposed to be in that specific environment and it’s not going to fluctuate to a different value that will ruin my footage.
Finally, when it comes to the ISO setting, you can set it to be a maximum of 200 for example. That way your drone will always be in an ISO value between 100 and 200. It will start from the lowest possible and when needed it will bump it up to 120, 150, 180 or 200, really depending on the specific scenario. But that way you will still have your shutter speed locked, you will have your white balance locked, and your ISO will be fluctuating a little bit between different values, but it will be exposing for the environment that you’re in. So you’ll not end up with very bright or very dark footage. I think this is the best middle ground when it comes to having a little bit of flexibility for your ISO but still having those manual settings locked.
ND Filters for the Avata 2
Now of course, when you lock your manual camera settings and you select those values that I just mentioned, you will need something to counter all of that light that is coming through the sensor. To do that, you will need to use ND Filters. ND filters are a must for the Avata 2 if you want to have motion blur, if you want to properly use those manual settings. We have these filters here from DJI – ND8, ND16 and ND32. These are included in the Fly More bundle and they are extremely important to have for the Avata 2 and for creating that cinematic footage.

Personally, I’ve never used anything besides ND32 on my Avata 2. This is my personal experience because I film in bright and sunny conditions. If of course I’m shooting in lower light where there’s not so much sun, maybe I’ll use ND8. But for now, ND32 is the only filter I’ve used. So I would advise you to start with that if the weather is nice and sunny.
Adding Motion Blur in Post
In case you don’t have the filters and you don’t want to use manual camera settings, but still you want to have that cinematic motion blur that is being introduced by using manual camera settings, there is still a little workaround for you if you’re using DaVinci Resolve or pretty much any other editing software for that matter. But I personally use DaVinci Resolve and I’ll show you a little hack on how you can add motion blur.
Here we have this footage that I shot without any ND filters in Auto camera settings. Obviously it doesn’t have any motion blur. When I play it and pause, you will see that everything is sharp because the shutter speed was high. To fix that and kind of fake some motion blur and make the video more cinematic, we can go into the Effects tab, go to Open FX and search for “Motion Blur”. Then just drag it on top of our footage.
Screenshot
” data-medium-file=”https://dronexl.co/wp-content/uploads/2024/04/DJI-Avata-2-1000×563.jpg” data-large-file=”https://dronexl.co/wp-content/uploads/2024/04/DJI-Avata-2.jpg” src=”https://dronexl.co/wp-content/uploads/2024/04/DJI-Avata-2.jpg” alt=”DJI Avata 2 – BEST Settings For Cinematic Drone Footage 3″ class=”wp-image-43855″ title=”DJI Avata 2 – BEST Settings For Cinematic Drone Footage 6″ srcset=”https://dronexl.co/wp-content/uploads/2024/04/DJI-Avata-2.jpg 1981w, https://dronexl.co/wp-content/uploads/2024/04/DJI-Avata-2-1000×563.jpg 1000w, https://dronexl.co/wp-content/uploads/2024/04/DJI-Avata-2-768×433.jpg 768w, https://dronexl.co/wp-content/uploads/2024/04/DJI-Avata-2-1536×865.jpg 1536w, https://dronexl.co/wp-content/uploads/2024/04/DJI-Avata-2-150×85.jpg 150w” sizes=”(max-width: 1981px) 100vw, 1981px”>
The next thing we need to do is go to the Effects panel here and we see that our Motion Blur is applied. We can apply less or more and you can already see that it works. However, this doesn’t look cinematic, doesn’t look even remotely good. So we will lower it to about let’s say 60%. We can change this Mo-S type – I’m not even sure what it is – but we can change it to “Better”. We can see that there’s been a little difference here.
The motion range we can change between small, medium and large. I will set this to large because it just makes the most sense for this footage. But by changing it you will see that there are some little artifacts, some little blurred spots that change depending on what type of selection you make. I think large works best for my footage, but obviously that’s not good, I don’t like how this looks.
So we need to go to the Advanced Controls and change the Blur Direction from “Both Directions” to “From Previous Frame”. Now you will see what I mean. If I bump up the motion blur to let’s say 100%, you will see that when “Both Directions” is applied, it just looks bad, it doesn’t look good. And if I play the video it just looks very fake and weird with those artifacts here, it doesn’t look nice. So we can change that and go “From Previous Frame”. This changes and kind of takes our previous frame as a point of reference on how to add the next frame with motion blur. I’m not sure I’m explaining it well, but this is what really works if you want to add motion blur.
And of course we need to lower it now because it’s way too much at 100%. So about 60% works great, and if I pause here you will see that we have a little bit of motion blur that we can see here now. If I remove that, you will see such a massive drastic difference that this plugin makes. When I play it like this it looks choppy and stuttery with a very high shutter speed. If I enable it and I play it once again, it looks a lot smoother and more natural to the human eye.
Color Grading
The next step is of course to grade your footage, add your little flavor to it, add a LUT to it, or manually color grade it like I said. It’s really a creative choice on how you want to make your footage look, how you want to make your viewer feel when they see your footage. Sometimes I’ve been really enjoying seeing some unrealistic type of footage where the deep greens are kind of overwhelming, or you have a lot of brown, you have a lot of yellow – some colors that kind of provoke some emotion in you. They don’t have to be realistic, they don’t have to really make sense, it’s a creative choice and it’s really up to you on how you want to make your footage look.
Screenshot
” data-medium-file=”https://dronexl.co/wp-content/uploads/2024/04/DJI-Avata-2-BEST-Settings-For-Cinematic-Footage-1000×563.jpg” data-large-file=”https://dronexl.co/wp-content/uploads/2024/04/DJI-Avata-2-BEST-Settings-For-Cinematic-Footage.jpg” src=”https://dronexl.co/wp-content/uploads/2024/04/DJI-Avata-2-BEST-Settings-For-Cinematic-Footage.jpg” alt=”DJI Avata 2 – BEST Settings For Cinematic Footage” class=”wp-image-43852″ title=”DJI Avata 2 – BEST Settings For Cinematic Drone Footage 7″ srcset=”https://dronexl.co/wp-content/uploads/2024/04/DJI-Avata-2-BEST-Settings-For-Cinematic-Footage.jpg 1982w, https://dronexl.co/wp-content/uploads/2024/04/DJI-Avata-2-BEST-Settings-For-Cinematic-Footage-1000×563.jpg 1000w, https://dronexl.co/wp-content/uploads/2024/04/DJI-Avata-2-BEST-Settings-For-Cinematic-Footage-768×432.jpg 768w, https://dronexl.co/wp-content/uploads/2024/04/DJI-Avata-2-BEST-Settings-For-Cinematic-Footage-1536×864.jpg 1536w, https://dronexl.co/wp-content/uploads/2024/04/DJI-Avata-2-BEST-Settings-For-Cinematic-Footage-150×84.jpg 150w” sizes=”(max-width: 1982px) 100vw, 1982px”>
And there you guys have it! I hope you enjoyed this video. Let me know if you did by clicking on the like button down below. Subscribe for more videos like this one. This is Mike from Drone Supremacy, take care and I’ll catch you in the next one very very soon. Ciao!


+ There are no comments
Add yours