


So today, DJI just made my life a whole lot easier with the release of their next-generation wireless microphone system, the DJI Mic 2. Now, out of all the equipment that I use on a daily basis—the cameras, the lenses, the tripods, the gimbals, the drones, the memory cards—out of all that stuff, DJI’s original wireless microphone system, the DJI mics, has probably been the piece of gear that’s made my life the easiest when I’m out shooting daily. I shoot social media content for different individuals and brands in my area here in Philadelphia, with most of these people wanting to be on camera and talking.
First impressions and review of the DJI Mic 2
And as we know, audio quality is just as, if not more important, than the actual video itself. I can personally excuse a video that isn’t lit properly, might be blurry from cropping, or even the compression that comes with uploading to a social media platform. But one thing that will make me tune out almost immediately is poor audio.
This is why the DJI mics have been so valuable to me in my workflow. I’m always on the go, always running and gunning. So, knowing that I have a microphone that I could clip onto somebody’s clothing and get nice, high-quality audio every single time really does make my job a lot easier.
In fact, it made it so easy that I carry two sets with me at all times. This gives me the ability to have a redundant pair in case one set breaks. But also, I can mic up to four people at once. It’s great because I can just take out one of the transmitters, clip it onto somebody’s shirt, or I can put it on their belt buckle or in their pocket, run a lav mic up their shirt, and press record. Let it record to the flash audio and sync up my audio later in post.
So, hopefully, I’ve set the scene as to how much I love these little microphones. But these are about to be retired as DJI has just dropped the newest version, which is, of course, called the DJI Mic 2.
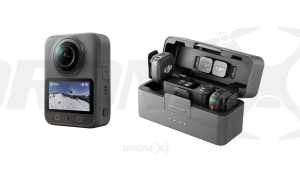
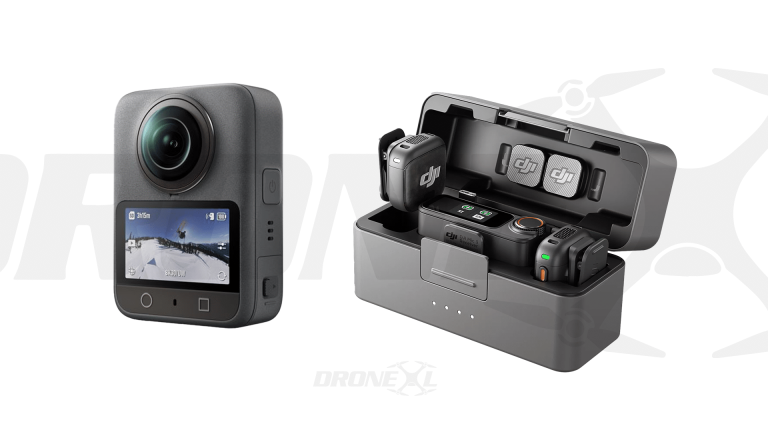
The Mic 2 here is very similar to the original wireless audio microphone set from DJI, in the sense that it has the charging case, two transmitters, and one receiver. But from here, everything else has been upgraded to give you an overall better audio capture experience.
So, in case you aren’t familiar, to give you a quick rundown of how these microphones work, you’ve got two transmitters and one receiver. Each of the transmitters has a built-in microphone and 8 GB of onboard storage, so you can use them as standalone mics right from the device.
You can press record, and it’ll save the audio directly to the flash memory onboard. You can also plug in a microphone that uses a 3.5-mm jack to store audio captured on that device instead of the built-in microphone on the transmitter. This means that you could use a lav mic or even plug in a shotgun microphone if you wanted to set up a remote audio source.
If you’re recording audio with these microphones, though, you’ll probably be using them in unison with the receiver, which allows you to control the transmitters when you have them set up to capture audio on yourself or another individual. It will wirelessly capture the audio from both transmitters into the source of your choice.
This means that you can take the 3.5 mm cable included in the box and bake that audio right into the video file that you capture on your camera, or you could use one of the included adapters to plug the receiver into your phone, thus replacing the audio that is captured with the onboard microphone.

Those little adapters slide into the pins on the backside of the receiver. The two transmitters, the receiver, and the two smartphone adapters all conveniently fit into the charging case, which helps you keep everything together and ensures that your modules are always fully charged.
It also acts as a charging hub, so if all of your batteries are depleted, you can just plug in one USB-C cable to the case, and everything gets power. So, no matter what type of video you’re creating, the Mic 2 is like a little Swiss Army knife. It can literally adapt to any situation, giving you nice high-quality audio regardless.
Now, the final thing I want to mention about the mics here is about the actual build quality because, as you can imagine, these things will get thrown around quite a bit. The case itself gets dropped on the ground, thrown in my backpack, and the transmitters get attached to people’s clothing; they go into a person’s pocket with their keys and phone. I mean, these things get put in the line of fire, and they just keep working.
The design of the mics and case is a huge step up over the first generation, with a more sturdy build. The moving components feel solid, the buttons are clicky and tactile, the screen is bright and easy to navigate, and the flexibility makes them very versatile to use overall.
If I want to capture audio with just the transmitter, I can use the clip to attach it onto a piece of clothing. If the clip won’t work, then I can use the included magnet to pin it underneath a piece of clothing, which is nice because it also helps you conceal the mic a little bit better if you want to hide the transmitter altogether.
You can use a lav mic to plug it into the transmitter, which can then go into a pocket or clip onto the waistband of pants or a belt. This is a lot more lightweight when you’re dealing with some loose-fitting clothing.
Design of the DJI Mic 2
With that said, before we get into the nuances of the DJI Mic 2, like the sound quality and recording capabilities, let’s first wrap up the physical design of the mics themselves and the accessories.
When you pick up your Mic 2 set, it’ll come inside this carrying bag with a charging case and modules, two windscreens, a USB-A to USB-C charging cable, and a 3.5 mm audio jack. There’s plenty of room to fit other accessories too, like lav mics and maybe a small set of headphones.
So, this little pouch can be like your audio recording bag with all of your things in one place. Now, speaking of the lav, this is the first time that DJI has made their own lavalier mic, which has just enough slack so that it can reach from your waist area up to the collar of your shirt.
It has a clip for affixing onto your clothing, and the little windscreen is tightly fastened, so it doesn’t pop off easily when you’re moving around or setting the mic up. If you are using the built-in mic on the transmitter instead, I’d recommend attaching the wind screen to cut down on wind noise and any pops that come from saying certain words. It attaches so easily by sliding this plastic piece into the 3.5 mm jack, holding it in place.
Audio quality of the DJI Mic 2
Okay, I’ve made you wait long enough. Now, let’s finally get into the sound quality and recording capabilities of the Mic 2, which most notably gives you a better-sounding audio file.
It’ll give you built-in noise cancellation, so it drowns out the background noise and isolates your voice right within the microphone.
It also gives you the ability to capture 32-bit float audio for more flexibility when editing your audio in post.
Okay, okay, so this here is audio captured directly from the DJI Mic 1. So, this is the original transmitter with the built-in microphone, and I haven’t touched up this audio at all. This is the audio file directly from the storage on the microphone, so it doesn’t go through any of the preamps on my Sony A1.
Now, I typically have a preset that I run with my voice to decrease background noise, boost my voice, and overall make the audio sound better. You’re now hearing the audio with that preset to see the difference that it makes.
Basically, every piece of audio that I record gets treated in some way to make it sound better.
Now, here, to readjust your ears, I’m going to take off that preset that I use and bring you back to how the microphone sounds with nothing applied. So, we’re back to square one.
Now, I also have the DJI Mic 2 in my hand here, about a foot away from my mouth. So now, we’re going to switch over to the built-in microphone of the new Mic 2.
And I have to say, there really is no difference to my ear in the audio quality right from the microphone, just like the original DJI Mic. It sounds a little bit flat, but with that same preset applied, it makes my voice sound brighter, isolates it, cutting out some of the background noise and open space, and overall makes it sound more crisp.
Okay, let me reset your ears again and bring you back to the raw audio. So, this is completely untouched, and it’s directly off of the microphone.
We’re now going to switch over to DJI’s new lav mic, plugged into the Mic 2. So, this audio you’re listening to is straight from the flash memory. And wow, I think this mic here sounds so good. It’s noticeably better than the built-in microphone on the transmitter, as it sounds fuller and brighter.
Just like the other audio files. I can also add a preset to this audio file to isolate my voice and make it sound that much better.
This here is probably going to be my go-to setup when recording audio out of the studio: the Mic 2 with the DJI lav mic attached, recording in 32-bit float audio, because, man, this sounds great.
DJI Mic 2 offers 32-bit Float Audio
Okay, so we’ve mentioned 32-bit float audio recording a couple of times in this video, and I want to make sure we’re on the same page here. So, 32-bit float audio doesn’t make the audio file directly off your microphone sound better. Instead, it gives you more flexibility when editing that file in post.
You can kind of compare it to editing a raw photograph compared to a JPEG photograph. So, when we capture our photos in raw, we can change the white balance and exposure after the fact, as if we’re actually capturing it in the camera right there. So, it gives us the ability to save a photo that is maybe too overexposed or too underexposed. And the same is true with 32-bit float audio.
If we record audio that’s too loud or too quiet, we can bring it back to normal right within the normal listening range without actually damaging the audio file. So, it gives us more range above and below the normal decibel level that we want our audio to be recorded at.
I have to give a huge shout out to Julian Krauss, who has a great video on 32-bit float audio and its benefits, which I’ll leave linked below. He starts the video off by showing the ability to recover audio files that are exported as clipping, too loud, or that are way too quiet, and then how when you try to recover the audio on a 32-bit float file, it can be restored to a clean file with nice-sounding audio.
I would highly recommend checking out his video because he goes into way more depth about 32-bit float audio recording than I will here in this video. But I do want to leave you with one real-world example where 32-bit float audio recording completely saved my ass.
So, here in South Jersey, I was filming a small convention for real estate agents, where they can hear from authorities in the space on how to improve their business.
One of the speakers that came out was way louder than the rest of the speakers. And because I was so focused on capturing his entrance and his actions, I didn’t have the chance to change the decibel level of the mic that I put on him before going up.
I’m going to play the audio from his entrance, and I just want to warn you that it is very, very loud. So if you’ve got headphones on, maybe turn down your volume or maybe just straight up mute the video because the audio was clipping like crazy.
“Everyone, have a seat. Everyone, how’s everyone doing?”
Okay, so yeah, that intro was pretty wild. Again, I’m so sorry if you were wearing headphones. Even if you turned your audio down, it still probably hurt your ears because the sound was clipping, scratching in-camera. It was totally unusable. I could never deliver that to a client. As I mentioned, the video might be fine, but if the audio sounded like that, you’re probably going to tune out, and you’re probably never going to want to even watch that video.
But because I recorded it in 32-bit float audio directly to the microphone, it completely saved me. So here’s the difference.
“Oh, make some noise! (Applause) Everyone, yes, have a seat. Everyone, how’s everyone doing?”
So all I did there was lower the audio by about 16 dB, so negative 16 dB, and it brought it down to a usable range. It still was a little bit distorted because he was just yelling so loudly, and the microphone was so close to his mouth. But again, to see how much range you can have there to recover really is impressive.
Now I think the best way to visualize this is to look at the waveform from those examples that you just listened to. So I’ve got the first audio clip that you listened to, which is actually just extracted from the video taken on my Sony A1.

So, this is the audio that was baked directly into the video file from the transmitter to the receiver. You can see that the levels have no depth to them, and as I tried to bring the volume down, you got this flat line here because the audio went past the point of recovery. This means that no matter how I adjust the decibel level, the audio will still scratch and sound terrible.
Compare this, however, to the 32-bit float audio file right off the flash memory on the transmitter, and I can actually bring this down again a full -16 dB, and we still haven’t clipped. So, as my buddy Colin is screaming at the top of his lungs over the music and crowd noise, I can fully recover this audio file thanks to 32-bit float audio.

What an absolute game-changer. This is like for me; I don’t record many of these crazy events where people are going to be yelling and screaming. But it’s nice to know that in my daily shooting where I’m talking to the camera or one of my clients is talking to the camera, then I’m going to be able to capture a nice usable audio file, basically no matter what.
This just adds is another level of reliability to these microphones that wasn’t present in my previous DJI mics. So, I know that if someone speaks a little bit lower or maybe a little bit louder, I can recover that in post-production without any problems or questions asked.
DJI Mic 2 Receiver Menu
Now, let’s take a quick deep-dive into the receiver menu. This small screen is how you’ll monitor your connection strength, battery levels, and overall control of your transmitters.
Swiping down will take you to different settings that you can adjust for the receiver, transmitter, and device in general. This gives you the ability to record in mono or stereo, or you can record a safety track.
You can adjust the gain of your receiver and transmitters, change the date, and pretty much anything else you need to change can be found in these different menus by swiping through.
I think one of my favorite additions, however, is this new wheel that allows you to change the gain on the fly quickly.
If I press this button once, it lets me adjust the gain for the receiver between -12 and +12 dB. Pressing it again lets me change the dB on the first transmitter, and doing so again lets me control the second transmitter.
Right from this screen, I can also swipe up on the first transmitter to access the controls for that module, or I can swipe up on the second transmitter for that module.
From this menu, I can individually mute the microphone, start and stop recording, or enable the new noise-cancellation feature.
Along with 32-bit float audio recording, this is another significant feature added to the next generation of wireless mics from DJI. It helps distinguish them from the original versions because, again, they are quite similar in design and capabilities.
But now, with 32-bit float audio recording built-in and the ability to use this AI noise cancellation feature to isolate your voice right within the mics, it makes it seem like a very worthy upgrade.
So, what would be a good way to test this out? I figured we’d try a leaf blower. In this first test, I have the DJI Mic 2 placed right outside of my shirt in front of my mouth. As I turn on the leaf blower, my voice starts to get completely lost as the wind and the sound of the motor overpower it, leaving me with an unusable audio file that probably won’t be recoverable.
A good way to remove wind noise is to use the built-in windscreen, which does a good job of cutting out the wind noise as I turn on the leaf blower. However, the sound of the motor is still there and drowns out my voice, making the audio difficult to clean up and use in a video.
So, what about this new noise-cancellation feature? I’ve removed the windscreen and enabled the noise cancellation feature, but it can’t seem to drown out all the background noise effectively. It doesn’t work as well as I had hoped.
Adding the windscreen helps the noise cancellation feature, but it still isn’t perfect, as there is some distortion in my voice, and the sound of the motor remains prevalent. At least the wind is gone, thanks to the windscreen.
This had me wondering, though, what if I took these same audio files and ran them through Adobe’s AI audio enhancing tool? Would they sound any better? In this first test, I have the DJI Mic 2 placed right outside of my shirt in front of my mouth. As I turn on the leaf blower, my voice starts to get completely lost as the wind and the sound of the motor overpower it, leaving me with an unusable audio file that probably won’t be recoverable.
I’ll tell you what, Adobe’s AI audio enhancement tool works like magic. I don’t understand how they do it. It sounds like they almost rebuilt your voice and gave you a new audio file using their AI. It can take some of the worst sounding audio clips and make them sound like they were recorded in a professional studio, and it’s really impressive.
Now, here’s one final example. I’m standing just next to Interstate 76 in Philadelphia, with hundreds of cars, buses, and trains passing by at high speeds every minute. I have both of my Mic 2s recording, one with noise cancellation turned off and one with it turned on.
Right now, you’re listening to the completely untreated audio, and my voice is overshadowed by the background noise of those cars. If I switch over to the mic with noise cancellation turned on, it does a good job of isolating my voice while making me sound natural, unlike the super robotic tone of the Adobe AI audio enhancement.
There is a little bit of distortion, as the software is trying to cut out the background noise as best as it can, but it sure is better than hearing the cars super loud in the background.
Now, just for fun, why don’t we try adding that Adobe AI audio enhancement to this example audio clip? So now, the background noise almost completely disappears, but, as I mentioned, I do sound a little bit robotic.
So, the Mic 2 is a fantastic upgrade over the original mic set from DJI. I’ll definitely be replacing both of my mic sets in my backpack with the new version, the Mic 2. So, I’ll have two of these in my backpack at all times for recording audio while I’m on the go.
Some notable upgrades for me, and why I think this is such an important upgrade, include the build quality. It feels more premium. The battery life in the modules and the receiver and transmitters is much better.
Additionally, the charging case is bigger to hold a larger battery, so you can spend more time shooting on the road without worrying about constantly charging your modules. I also love the pouch that it comes with. I love the 32-bit float audio. The AI noise cancellation feature is okay; I think I’d rather record without it turned on and then use Adobe’s AI audio tool if needed afterward.
Overall, this is a great upgrade from DJI with their Mic 2, and I’ll be using this on a daily basis.
Thank you guys so much for watching my DJI Mic 2 Review, and as always, I’ll talk to you in the next one. Peace.


+ There are no comments
Add yours