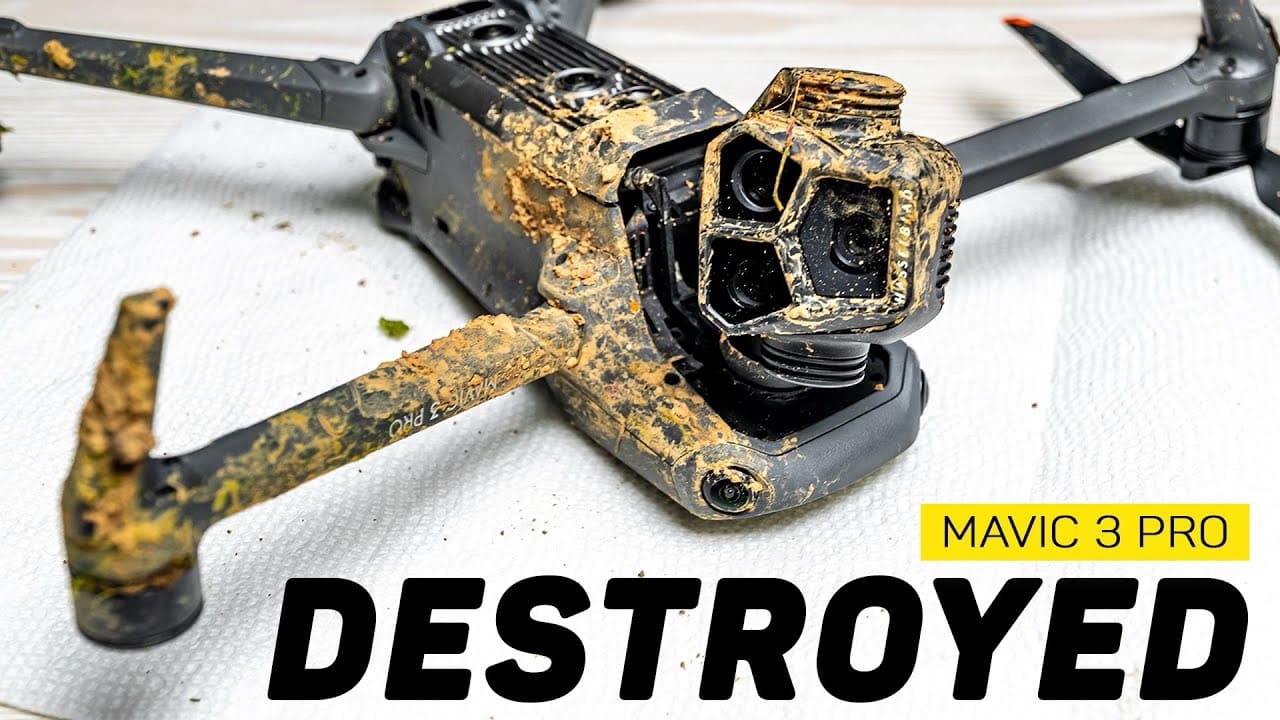
So, you’ve probably found yourself wondering at some point what a Mavic 3 Pro looks like when it’s completely caked in dirt, dust, and mud.
Also, what does it look like when the camera just doesn’t want to stay in place?
Well, that is now my Mavic 3 Pro, which is basically completely destroyed.
With this video, because of this drone and its current state, I’ve got three topics that I want to discuss.
1. Get back to flying your drone asap
There are three things that I really want to highlight, as there’s a lot to consider when a drone crashes. Sometimes it can set you back financially, and sometimes it can affect you mentally, as you might become a bit gun-shy.
Regarding the Pro and the flight log that shows the ESC error in the top corner, I was actually on a job site flying my drone, taking some stockpile measurements. I was manually taking the photos to stitch them later using Drone Deploy. After I did the first pile, I was looking at a set of plans to figure out where I had to fly next.
As I was doing this, out of the corner of my eye, I saw the drone remote and the screen showing it falling from the sky and eventually hitting the ground.
As for a quick damage assessment of the actual drone, it fared pretty well for falling from about 100 feet high. There’s no damage to any of the legs; they still fold and work completely fine, which is nice.
However, I can’t say the same for the gimbal, which became completely detached from the drone. That would need to be completely replaced. I’d also need a new ESC for the one that failed, and I’m missing a propeller here, which I can only imagine fell off during the impact.
Look, everybody loves a good drone crash story, and I wish I could say that I was doing something really awesome, trying to get a great shot and hit a tree, or something similar.
But no, it was just hovering there and fell out of the sky. This brings us to the first point I want to make in this video: be careful with your drone. I made a video about two years ago where my Inspire 2 completely fell out of the sky on its own.
I had just gotten it fixed and took it out for its first test flight. The drone spun like a top, fell to the ground, and was completely destroyed. For me, this was a huge wakeup call because I had no control over what happened with the drone at that moment.
Thankfully, during my first test flight, it was over a golf course where literally nobody was. It was a nice open area for testing, but what if something had happened on a later flight, or the flight after that?
What if it happened when I was 10 flights in after that repair, over a busy neighborhood, photographing or taking video of a home, and the drone fell on somebody’s car, roof, or someone in the neighborhood?
These are things you need to think about, and while you can’t always mitigate that risk 100%, it’s something you need to be aware of.
For example, with this crash of my DJI Mavic 3 Pro, which I can’t stop looking at, it looks terrible. It fell over a job site; there was nobody there, which was fine. It fell in some grass. When I picked it up, of course, I had to use a different drone to finish off my shoot.
At that point, I was relieved it happened in an area that wasn’t populated. I do a lot of flying in the city and neighborhoods, and if this drone had fallen over the Schuylkill River and into the water, it would be completely gone. I’d have no shell to go and recover. So, these things can happen at any time, and the first thing I really want to emphasize in this video is to be careful with your drone because anything can happen at any moment.
2. Use the right drone for the job!
Moving on to point number two: I am very upset with myself for deciding to use one of my most expensive drones to complete a service that is one of the more inexpensive options I offer. A stockpile measurement is really volume-based; it’s something you want to offer at a lower cost so more people use you, allowing you to bring in more business.
That’s how I market the stockpile measurements, because they’re very easy to do and require like no post-processing work. It’s just flying, taking your photos, uploading them to Drone Deploy, finding the measurements, and then sending them off to your client. It’s very easy, which again is why I charge so little for it, and then I get more work because of it.
But why would I use a drone that costs several thousand dollars to complete that task when I could just use a Mini 4 Pro? This drone is so much less expensive and would get the job done in the same way. I
guarantee you that for any of the shoots I do in any given week, whether they’re real estate-related, construction-related, or just for a general client who wants aerial photos and videos, they wouldn’t be able to tell the difference between the Mini 4 Pro and the Mavic 3 Pro‘s camera.
Now, I will say that I think the reason people buy the more expensive drone is for the overall better experience when using it. I like the ability to fly faster and for longer with my Mavic 3 Pro.
Well, honestly, they have the same flight time, but I prefer all the conveniences of having a larger drone like the Mavic 3 Pro over the Mini 4 Pro, and that’s why I fly this drone often. But I think to myself, if I’m doing a shoot that’s only several hundred dollars and then I fly my drone that’s several thousand dollars and break it.
I’m now out of money for that shoot and maybe other shoots in the future. I understand it’s like a risk of doing business, a cost of doing business, but it’s just something that’s tough to swallow.
So, after all this ranting, the second point I want to make is that no matter what you’re doing out there with your drone, chances are you could do it with a cheaper option. So, if you’re someone looking to get a drone, go for something less expensive because chances are, nobody’s going to know the difference in the quality of the images you produce.
3. Get your DJI Mavic 3 drone repaired by DJI
Now, finally, the third point I want to hit on in this video is about getting your drone repaired by DJI. I’ve unfortunately had to get a lot of drones repaired by them, but the process is always super smooth, very easy, and also very affordable.
This section of the video is going to be about my experience actually getting the drone repaired, which is still sitting here in pieces, you could say, caked in mud.
So, let me ship this drone off, and once I get it back, I’ll update you about how long and how much it cost to fix my Mavic 3 Pro.
Alright, so I finally got my Mavic 3 Pro back from DJI after being repaired. They turned it around fairly quickly, and it was also an inexpensive fix. What I want to do in this portion of the video is go over my experience using DJI’s repair services outside of their Care Refresh plan, because I didn’t opt to purchase that for my Mavic 3 Pro. Instead, I was just going to pay the bill when it was sent to me.
Now, what I’m going to do is do a first flight with my Mavic 3 Pro out in the frigid temperatures here in Philadelphia.
Of course, when this is shipped back to you, it’s not going to be sent in the full-on packaging that you would receive if you were to purchase a brand new Mavic 3 Pro.
But instead, oh look at that, it actually does come inside of this small little box here. So, this here is the Mavic 3 Pro that I received back from DJI. We can go ahead and open up the box to reveal the actual drone itself. I don’t usually do live unboxings here, but we’ll switch it up for this video.
Alright, so tear the box open, and it just comes inside of this small little plastic wrap. I’m speaking from experience because I’ve gotten drones fixed by DJI in the past, and looking at this drone, each time I’ve gotten it fixed from DJI, it looks brand new.
It still has stickers on it, comes with brand new propellers, and a brand new never-used propeller guard and gimbal guard. The way you can tell that it’s brand new and never used is because this section right here isn’t worn out.
This leather strap sometimes gets worn out and a little bit warped when you use it. So, I have pretty much a brand new drone here from DJI, which is awesome, because I feel like there were a couple of issues with my drone that I wanted addressed outside of the actual crash.
Now, there are probably two things that you want to know: how much did it cost me, and how long did it take DJI to actually get the drone back to me from the time I sent it? So, it only cost $68, and it took DJI 21 days or 3 weeks to turn around this repair, from me shipping it to them to me receiving it back from them.
So, all in all, I couldn’t be happier with my repair service because it was inexpensive and it was quick.
Now, to give you a quick breakdown or a detailed view of the entire timeline: I crashed my drone on Thursday, December 28th. I shipped it on Friday, December 29th. It was then received by DJI on Saturday, January 6th. Of course, the holidays kind of slowed things down there.
They didn’t end up diagnosing my drone or looking at it until Tuesday, the 9th. They then quoted me, and I paid on Wednesday, the 10th. They completed the repair on Thursday, the 11th, and shipped it out that same day. Then, I received it on Wednesday, the 17th.
Now, even though they say they completed my repair, DJI actually doesn’t repair your drone and then send it back to you. Instead, you get basically a brand-new drone, or a refurbished drone, or something like that.
So, this inside of this plastic here is not my Mavic 3 Pro; this is a completely different Mavic 3 Pro. But again, this is something that is pretty much brand new, right off the shelf, which is awesome because I feel like I can now hit the ground running with my drone.
Also, it just speeds up that repair process, and I don’t have to spend that time waiting for them to actually clean my drone, fix it, and then send it back to me. So, it’s definitely expedited in that regard.
Now, I guess I got lucky in this situation. I’ll put my invoice up here on the screen for what I actually had to pay. Again, it was $68. The $65 charge for the repair service fee was actually the most expensive thing that I had to pay for.
But then, I also had to pay $3 for a gimbal lower vibration-absorbing board, and that was it. $68 for that repair, for my camera basically coming entirely detached from the drone, is definitely a good price, in my opinion.
So, what I want to do is bind up my Mavic 3 Pro to my RC Pro, throw a battery in, and hop outside to do a very first flight. Remember, it’s cold, so this is not going to be a very long flight.
Yes, you can just tell this thing is brand spanking new. I just took all the stickers off; there are absolutely no blemishes, no marks on it whatsoever.
So, again, that is the good thing that comes from crashing your drone and paying to get it fixed – you get a somewhat brand-new drone.
Okay, so let’s do our first flight here with the Mavic 3 Pro, the new Mavic 3 Pro. Now, I just pretty much put this thing in automatic. I don’t even have an SD card in here; again, this is just to kind of get my feet wet with this drone again.
You might be wondering what I’ve been flying during my time here without the Mavic 3 Pro. I was flying the Mini 4 Pro and the Air 3, so those were kind of like the two drones that I was flying in tandem. But, boy, oh boy, did I miss the camera on this drone. The clarity is just out of this world.
So, we’re recording in 4K, and we’re going to buzz on down to the river or down to the bridge over the river. In my opinion, the Mavic 3 Pro and Air 3 are neck-and-neck in terms of performance, so I wasn’t really missing the performance as much because the Air 3 is an absolute beast when it comes to flying.
I do have to change my gimbal settings here; you can see this thing is super quick. But the one thing I did miss is the actual camera quality, the image quality coming from this drone because it’s just out of this world.
Also, I was flying the Mavic 3 Cine a little bit. I do have that drone as well, which I was using before the Mavic 3 Pro even came out. And when using that drone, I really did miss the medium tele camera.
I missed being able to use the 3x zoom. I actually was on a construction site flying my Mavic 3 Cine because I was trying to do some hyperlapse stuff with the 1-second interval, and I missed being able to use my 70 mm lens when trying to capture the workers working.
Now, I was able to use the 7x zoom, but I felt like that was a little bit too tight, so the 70 mm on the Mavic 3 Pro really does make a difference. And of course, on the Air 3, it makes a difference as well.
It’s nice; we have absolutely no wind today. It’s been so windy around here, but this drone is getting after it, up and down the water. This is always a great time to do a first flight over a nice, unpopulated area, over the water, over a field, over something like that.
As I mentioned before, when my Inspire 2 went down, that was a very scary situation. If the drone went down here in the water, I suppose I’d probably be screwed. But again, we’re in a nice open area here, where if the drone falls down, it’s not going to hurt anybody; it’s not going to damage any property.
So that is, in my opinion, always the first thing you want to do when you get a drone: just make sure it’s okay, as I mentioned at the beginning of this video.
So, I know that we covered a lot of ground here in a video that I probably didn’t anticipate making unless my drone crashed. But look, being careful with your drone is always of the utmost importance.
I think that it’s really important just for the hobby and for the industry in general. Also, don’t go and buy a drone that you think is going to be too expensive. Don’t spend all of your money on that Mavic 3 Pro because you want the best image quality, if the drone is only a very small part of your workflow, if it’s only a small part of the services that you offer.
Go look at the DJI Mini 4 Pro; go look at the Air 3. Spend less money on that drone because if it crashes, you’re kind of… well, you know. And also, the final thing is DJI Care Refresh. I think that DJI Care Refresh is a great thing to purchase.
I think that if my drone was way more messed up than it was, if there were way more issues than just camera damage. If there were issues to the actual camera housing and body itself, if there were issues to the actual drone body itself, it could have been a much more expensive repair for me.
I got lucky, but it’s kind of the risk that I take when I fly these drones. And also, just make sure you have a backup if it’s something that you do often. The Mavic 3 Pro is a drone I fly each and every day, and when it went down, I was sad because it’s the drone I use every day. But I had backups in place, so having a backup is always super important.
Look, it’s like 20 degrees outside, so I’m going to wrap up this first flight with the new Mavic 3 Pro.
Thank you guys so much for watching. If you’ve got any thoughts, be sure to leave them in the comments below, and as always, I’ll talk to you later. Peace.






+ There are no comments
Add yours