


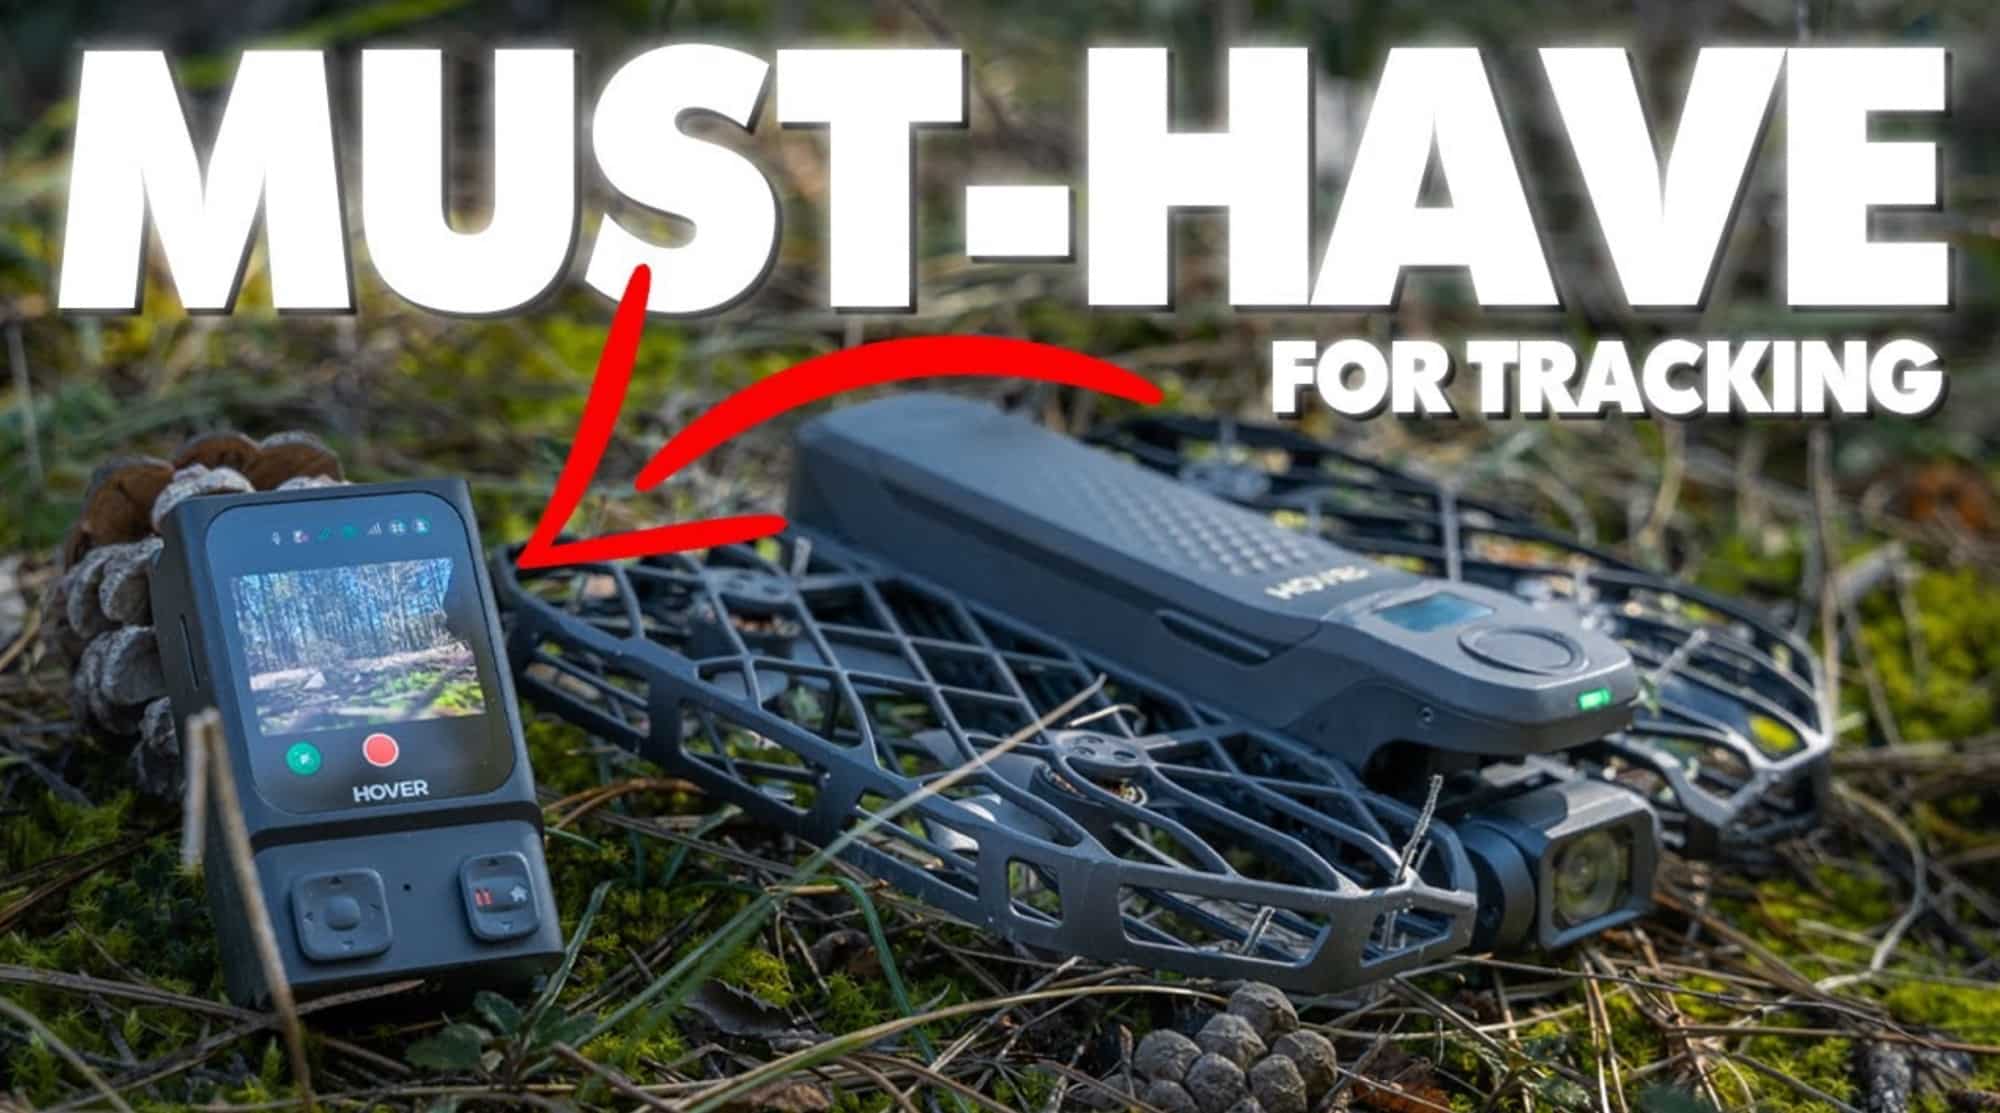
Today, it’s all about one of the most interesting drone accessories that I’ve encountered recently, namely the beacon for the HOVERAir X1 Pro Max. Let’s check it out. Z00 Robotics reached out to me recently, and they wanted me to share a bit more of my experience with the beacon. They were also kind enough to sponsor today’s video. In this video, you will learn more about what makes this device unique and how you can take advantage of the different ways to control your drone with it.

Examining the Beacon
First, let’s examine the beacon itself. It’s a pretty small standalone device with a touchscreen display and a few buttons. Below, you have a power button on the right side, a joystick on the left, as well as one on the right, together with a pause button and a return-to-home button in case of an emergency.

Modular Design and Controllers
One of the coolest things about the beacon is that it’s modular, meaning you can use it in many different ways depending on your needs and preferences. In this case, you can see we have two additional parts that can be attached to the beacon: the left controller and the right controller. These are traditional joysticks with a magnetic attachment.

Allowing you to quickly attach them to the beacon unlocks new ways of controlling your drone. When you attach the right controller underneath the beacon, you will hear a click sound, and the two are then connected. The beacon recognizes the device and now operates like a motion controller. You have a trigger button on the back, and you can press it and tilt this whole contraption front, back, or side to side, and the drone will move in that direction. You can, of course, also use the joystick to regulate the height of the drone, all while watching the real-time view from the camera on the beacon’s display.

If you want to control the drone in a more traditional way, you can also add the left controller to this contraption, attaching it the same way on the left side of the beacon. Then, what you need to do is simply unfold the arms of the controller and twist them down. Now, you have a very traditional-looking remote that has a built-in screen, which, yes, is quite small, but still, it’s visible. Or, if you want, you can add your smartphone and use its display as a screen by connecting a cable to this whole thing.
Standalone Beacon Features
The beacon, as a standalone device, like I mentioned earlier, can be used with its buttons to control the drone or simply as a beacon. This is the point that the drone would follow when it starts flying in tracking mode, and the built-in display helps you a lot to know if you’re framed properly, if the drone happens to crash, or for many other safety purposes. One of my favorite ways of attaching the beacon is to a bike with a handlebar mount, which you will see in action in just a minute. But before that, let me show you a quick setup of the beacon and the other parts of the remote controller, so you can see how easy and intuitive everything is.

Setting Up the Beacon
First, we need to power on the drone; then we can turn on the beacon itself by holding the power button on the side. We can see the beacon is searching for the drone via Bluetooth, and when it finds it, you will see the camera view on its display. From then, you can toggle between all the different flying modes, which we have here: hover, zoom out, follow, orbit, bird’s eye, dolly track, sight track, ski mode, cycling mode, dolly zoom, and indoor follow—a quite large collection of different flight modes.
And moves that the drone can perform for you. You can start and stop recording from the button in the center of the display, and you can see the battery levels of the drone and the beacon as well as a few different parameters like omni-terrain and microphone. Maybe a small thing that I would personally love to see implemented is a swiping gesture from all sides of the screen for accessing different features and slightly larger icons for easier pressing, especially since we don’t have that many elements on the screen anyway. Now that you have seen how the beacon works and how you can use it in a variety of different ways, let’s check out the new cycling mode which Z00 Robotics introduced with one of their latest firmware updates.
Testing the Cycling Mode
So here we have the setup: the drone is ready. Then we have the Osmo Action 5 Pro capturing my reactions. And here we have the beacon, which is connected to the drone and sits great on the handlebars, showcasing everything that’s going on through the lens of the drone. Right, so we’re on the bike, we’re in the forest, and obviously the first thing we need to do is turn on the beacon.

We’ll do that. The next thing I need to do is take out the drone from my pocket, which is the biggest flex since the drone is so small. Now I need to unfold it and also power it on. So, we’re waiting for our beacon to connect to the drone, which right now is already connected. From the beacon itself, let me just take the camera so I can show it to you. From the beacon itself, I can set it to cycling mode, ski mode, cycling mode, and just confirm. Then I can place you back here on the bike and simply press once on middle cycling mode, and we’re off in the air. So, I have the camera view of the drone here on the beacon. I can see myself, not really because it’s quite dark due to the sun. But still, I’m recording on the Osmo Action 5 Pro, and we’re off with the HOVERAir X1 Pro Max and the beacon. Now, one thing you should know is that this cycling mode has two settings that you can check out. One of them is for tight trails.
And the other one is for more wide-open trails, so obviously, here, things are a little bit too tight. That’s why I’ve set it to that setting, but later we’ll check out the other one as well. Everything is kind of freezing because the weather is around 0°, even though we have some sun. Still, it’s quite cold. Let’s pick up some speed. All good on the drone from what I’m seeing, and I’m a little bit out of breath already. That’s just ridiculous.
Adjusting Settings for Open Areas
But yeah, that’s how things are right now. Now we are in a lot more open area, so I’ll change some of the settings here in the app, where I can set the altitude, the distance, the duration of the shot, and of course, the cycling environment, which I just mentioned. If we want to keep it in narrow routes or open areas, I’ll switch that to open areas, and then I will change the distance to far and the altitude to high, just to get a little bit more of a different perspective. So we have done that; now we can just start flying. We’re recording. I can see the beacon. Let’s go. I will also pick up the speed a little bit more, and let’s see if the drone will be able to keep up without any issues.

Let’s stop for a second. I just need to tighten some of my mounts here because my camera is just falling. Other than that, we’re fine. Let’s continue. I can see the drone is doing very, very well, and let’s go. This is super bumpy. Okay, this is super, super bumpy. It is great for riding, though.
Navigating Challenging Terrain
Okay, I need to be super careful here with the amount of mud that we have here. Let’s adjust those mounts once again. The drone is showing zero hiccups though. Zero. I’m struggling a lot more than the drone. Everything is freezing here, so at least it’s not like liquid mud, but still, it’s definitely not the best for riding.
Ooh, and we need to go around this huge puddle here. Yeah, we need to pass through here, just to make sure I won’t get into the puddle.
Where are we? It’s all ice here. Oh my God! I am loving it, but as you can see, guys, absolutely zero issues for the drone. It’s following me, even from a further distance back from a higher altitude. These little twigs? Not a problem for the drone, and it’s just going and going after me. I love it!
Conclusion
And there you guys have it. This is the beacon for the HOVERAir X1 Pro Max. I hope this video was informative and entertaining enough for you so you can get a grasp of everything that you can expect out of this great device. I think it’s a must-have device if you have the HOVERAir X1 Pro Max, because no matter what you throw at it, it will just pull through. It will keep going, and it will keep following you, keeping you in the middle of the shot, producing some great shots for you while you’re doing something like me on the bike. I’ll catch you in the next one. Stay safe, take care, and goodbye!
Discover more from DroneXL.co
Subscribe to get the latest posts sent to your email.


+ There are no comments
Add yours