


Welcome to episode two of Quick Tips for your DJI Mini4 Pro. My goal with these quick tips videos is to help you understand all of the features of your drone with as little talking as possible, so let’s get right to it.
Subject Scanning for Improved Tracking
The first feature today that I’d like to help you better understand is subject scanning. If you enjoy tracking subjects such as people, vehicles, or boats, this is the absolute best way to do it. I know I’ve already talked about subject scanning in my previous Quick Tips for your Mini 4 Pro video, but I wanted to mention it again because I’ve been doing a lot of testing with it.

I’ve found that it’s more stable when you use subject scanning to choose your trackable subject versus when you swipe on the screen to select it. Subject scanning is way more reliable and whatever you’re tracking stays locked on better. I don’t know if it has to do with the algorithm of the drone, but when you swipe on the subject, sometimes it doesn’t even recognize that it’s a trackable subject, like with cars or people.
However, with subject scanning, it’s already determined if it’s trackable. Then you just tap on the plus sign and it stays locked on. It is much more stable and reliable. So I just wanted to reiterate: use subject scanning as much as possible when you’re doing active tracking.

Direct File Transfer Convenience
This next one is huge, at least it is for me, and it’s direct file transfer. If you’re anything like me, you tend to forget your microSD card in your computer after you have transferred your files. You pop it out of the drone, put it in the computer, transfer the files, and then take your drone and pack it up. That microSD card is still sitting there on the computer! I do it so often that I keep an extra microSD card in my vehicle now.
But with the Mini 4 Pro, you don’t have to worry about that because you don’t even have to take the card out of the drone. All you have to do is connect your drone to your computer with a USB-C cable. You don’t even have to turn the drone on and it’s going to pop up on your Finder. You can then transfer your files that way. It’s so convenient!
When you’re done, you unplug it and take your drone with the card still in there. So the next time you go fly, you don’t have to experience the sadness that ensues when you get out there, have the perfect shot, and realize that you forgot your microSD card. Start using direct file transfer – it’s very convenient!
Capturing Smooth Shots with Waypoints
The third tip that I have for you today has to do with capturing the smoothest drone moves possible with your Mini 4 Pro. Yes, flying manually and capturing a beautifully smooth shot is very rewarding. You feel very accomplished when you’re able to do that.
But why go through all that stress when you don’t have to? Keeping your stick movement consistent is very difficult. You can use Cinematic mode, which slows down everything, but even then your fingers are always going to make little adjustments and movements. If it’s a long shot, your thumbs and fingers are going to get tired, so it’s not going to be consistent. It’s never consistent. You can also use Spotlight mode, which is kind of nice with the focus tracking. Use Spotlight, choose a subject, and then you can do pretty smooth things that way. But that’s not always consistent either – sometimes it loses the subject that you have locked on to.
If you haven’t been already, start using waypoints for everything! Use waypoints to capture consistently smooth shots. Position your drone, position the gimbal at the angle that you want, enable your waypoints by hitting the little sideways “S” over there, and then hit your C1 button to set your first position. Move the drone to the next position, change your gimbal angle to however you want it, and then hit the C1 button again. Do that however many times you need to set up the smoothest shot available. Start the mission and let the drone do the work.
Let it move through the sky with unwavering precision. It’s one and done and there’s no stress for you, and the shot comes out perfect every single time. Use waypoints as much as possible – it’s the greatest feature that’s ever been brought to a drone!
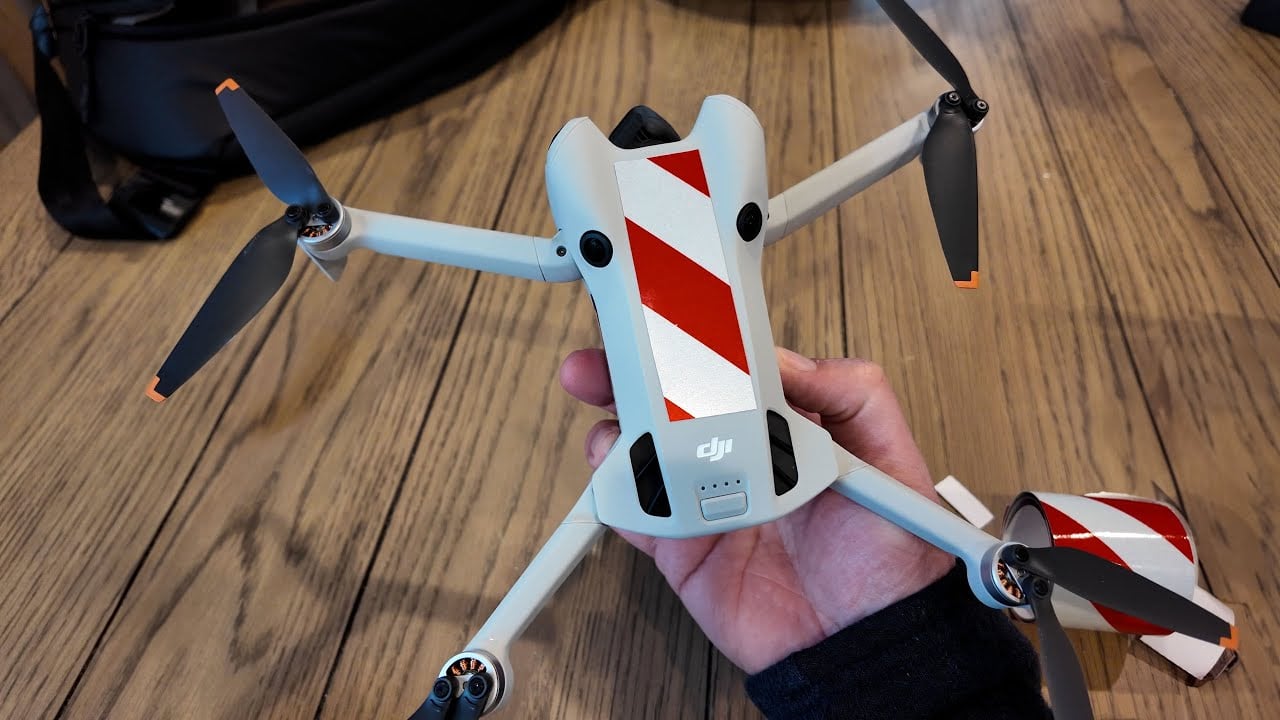
Deterring Birds with Reflective Tape on DJI Mini 4 Pro
Have you ever had issues with birds getting a little bit too close to your drone? I know a lot of people do. I have quite a bit actually, especially when I’m flying downtown. The pigeons get a little upset, and we also have a lot of these gulls around. They’re not seagulls, they’re some kind of gulls – I don’t know, terns or whatever. But when I’m flying anywhere near the city landfill, they are very aggressive towards drones.
So I hopped online, did a little bit of research, and found this tip from a fellow YouTuber named Brett Con. I think it’s worth sharing for those of you who fly around birds. Get yourself a roll of this red reflective tape – you know, the kind that people use when their tail light gets broken and they need to cover that hole. It needs to be reflective. Place pieces of it on your drone all over, as much as possible. Don’t cover any of the sensors. The birds will leave your Mini 4 Pro alone!
I haven’t done it yet. I just bought my roll of reflective tape, so I’m going to try it. Every spring right by my house, we get hundreds of these geese at a little lake nearby. They come here for the first 3 or 4 weeks of the spring and they’re everywhere. I can’t even fly at home because there’s so many of them. So I’m going to try it and update you in the comments if it does work for me. But I think it’s a pretty inexpensive thing to try, especially if you fly around where there’s a lot of birds.
It does work in vegetable gardens – I know a lot of people put that in their gardens to keep the birds away from their strawberries or raspberries and stuff like that. So it stands to reason that it would work on your drone as well.
Using QuickShots Beyond People
QuickShots is a feature that really is designed mostly for beginners, but they can be used by anyone at any skill level. I think one thing that most people don’t realize is that you can use QuickShots on more than just people. All of the tutorials out there, even myself – I’ve done QuickShot tutorials with just myself as the subject.

They all demonstrate with a person. But you can use QuickShots with anything as your subject. All you have to do is just highlight whatever you want to highlight by swiping on the screen, the same way that you would with a person, and then run the QuickShot mission, whichever one that it is. This is a super easy way to get some cinematic aerials.
Drone Controller Orientation Indicator
This next one is not so much a tip, but just kind of more for your information. I actually don’t think too many people know this, so that’s why I wanted to share it here. If you look at the radar/SL attitude indicator here on the bottom left side of your screen when you’re in radar mode, take a look at this icon. You see how it’s blue when I’m facing away from the drone? Watch what happens when I turn the controller to face the drone – it turns green. That’s when you know that you have the best signal possible.
So if you look in the lower-left corner of my screen here, you can see that I (that’s the little blue dot) am blue, and that’s because the drone is behind me. I’m facing the camera. But watch what happens when I turn the controller and point it directly at the drone – boom, green right there! See, is that cool?

So that just tells you that you have a really strong signal between the controller and your drone. Even if you vary it just a little bit, you can see that it turns from green to blue. So you know that it has a perfect connection when it’s facing directly at the drone. It’s really nice to have that feedback.
Using AR Features
The Mini 4 Pro brought us AR settings for the first time in a mini drone, and it does kind of sound like a gimmick at face value. But I can tell you that having that little virtual “H” on the screen that shows you where your home point is has been incredibly valuable. Knowing where you are in relation to the drone is very important, especially if you’re flying in an area where you’re not familiar with the surroundings and you’re not quite sure of the landmarks.
Seeing that “H” brings a whole lot of comfort. So turn on the AR features in the settings. The Return to Home beacon is kind of cool, it looks cool, but I really don’t find it that useful. I know that the drone is going to be safe on its auto Return to Home, so I do think that’s maybe a little bit unnecessary, but it is kind of cool.
Recording in D-Log M
The last and the most important tip that I have for you all today, at least in regards to getting the best looking footage possible, is to start recording everything in D-Log M. I’ve said it before in other tutorials, but do not be afraid to record in that 10-bit color profile. It is so much better and it is incredibly easy to color. I’ll show you here just in a few seconds in CapCut.
I like CapCut – it’s my favorite absolutely free editing program. Anybody can learn it, anybody can use it, and the steps are going to be about the same for any editing program that you use.
All you have to do is import your clip. Here I have a simple fly-away clip that was recorded in D-Log M. Find the adjustments (or sometimes it’s called the Lumetri Color tab – I don’t know what the other names for it are), but find the tab in your editing software where you can change these settings.
Then all you have to do is increase the contrast to your liking, increase the saturation, and most of the time that’s all you have to do. You can mess with the brightness a little bit, you can mess with the white balance just to kind of tune it in to the way that you want it to look.
But overall, the contrast and saturation is where you’re going to get most of the work done. It takes literally seconds to edit D-Log M footage. So start recording in that if you’re not. You can also use HLG. I know some people like to use HLG, but honestly, I don’t think there’s a need for that because D-Log M is so much better.
Final Thoughts on the Mini 4 Pro
Do you have more questions about the Mini 4 Pro? If you do, ask away down in the comments and your question might end up in my next Mini 4 Pro Quick Tips video.
If you want to see all of my favorite drone and content creation gear that I use here for the channel, for my real estate work, for anything that I use with my drones or my cameras, check my affiliate links in the video description. I just updated it this week with some of my newest favorite tech products and I know you’re going to find something you really need there as we get closer to the best season of flying – the spring is the best time!
Click that thumbs up if I provided you with anything of value today. Watch this video right here next for something that’s really going to make you think.
Thank you for watching the entire video today everyone, I appreciate you so much for doing that. Have a great day and as always, fly safe and fly smart!


+ There are no comments
Add yours