


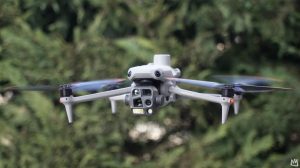


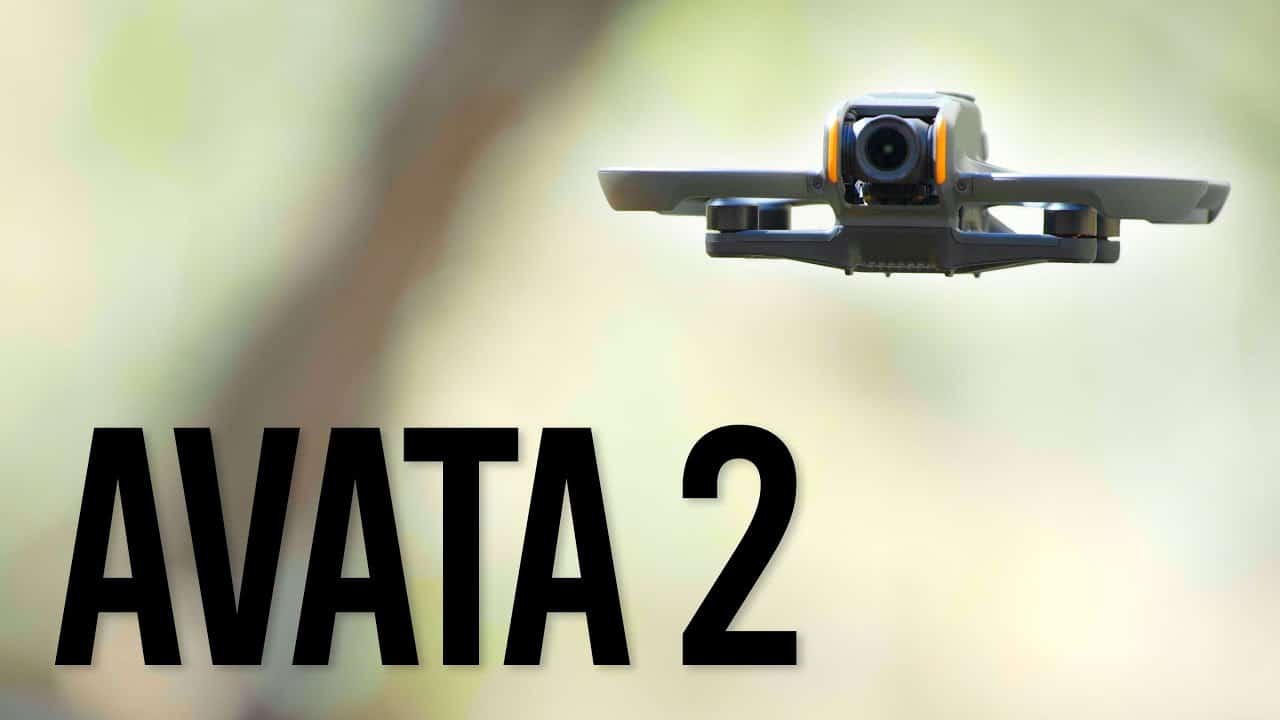
Now this right here is the DJI Avata 2, which is the big brother to the original Avata. In this video, we’re going to do a full review of this drone, talking about some of the features that transferred over from the old generation and then also some new features like the new goggles that have augmented reality, a new controller that has the ability to go backwards, do some cool tricks, flips and everything, a new battery design, and then also a brand new controller here that looks just like the old one. So let’s get to it.
Design and Build of the Avata 2 drone
Let’s get started with the air unit itself. You’ll notice that there’s a bit of a smaller footprint compared to the old one and that’s mostly because it’s a little bit lower and then the main fuselage, if you want to call it that, is a lot skinnier than it was on the other one. The footprint is a bit wider on the propellers here on the prop guards, but otherwise, I think a much beefier design.

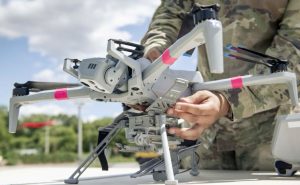
Looking at the exoskeleton at the bottom of this one, there are parts available for this drone if you want to make some fixes and you know if you hit it a little bit too hard. We did crash it also during our testing, not super hard, just the traditional stuff that you would do with an FPV and it survived everything so far.
One thing that you’ll notice in the back of this right here is we have what looks like obstacle avoidance sensors. They’re not, they’re actually position sensors. They do look like any of the obstacle avoidance sensors that you see on DJI drones, but these are really designed along with the IR sensors down here at the bottom. They’re designed for when you are in a GPS-denied environment, so they’ll help you hold altitude and do a whole bunch of different placements to make sure the drone is pretty stable.
Weight and Regulations
As far as the weight, 377g, and yes, I will say it right now, the DJI Avata 2 is not a categorized drone. It’s not Category 1 because it’s over 250 grams. It’s also not Category 2 because it’s not approved by the FAA at the moment. It doesn’t have a declaration of compliance. I don’t think it will because the original one didn’t have it and DJI hasn’t really submitted any of these for categorization. But at the moment, you cannot fly this drone over people and/or people in moving vehicles. Really, this is designed to fly indoors.

Propellers and Sound
If you look at it, it’s got the ducted propellers which is great so that you don’t hit anything, you don’t hit the propellers on the walls for example when you’re in different areas. The DJI Avata 2 also has OcuSync 4, which is the or they call it O4 these days from DJI, that’s a transmission system, very very strong. Also, the one thing that I appreciate the most I think is the sound.
This sounded like a horde of screaming bees, and this doesn’t, I think mostly because of the new propeller design. This is a three-bladed propeller design. This was five-bladed propellers, much quieter, lower pitch. This was very high pitch, very annoying actually to be around. This drone, you could not fly this drone without somebody looking up and seeing that the drone was right there.

SD Card and Battery
Also, a big improvement that I need to mention that might sound a little bit dumb, but the SD card placement right here, the slot is in a much better position where you can actually access the SD card slots. In the past, it was inside of the duct right here and just a horrible placement. I cursed many many times trying to get this thing out.
Also, you notice we have a new battery design. The batteries are much skinnier, even though they’re not any worse as far as flight time, but they’re much easier to put in and kind of put in place right here. We’ll have a full segment on the battery coming up in a few minutes.
This was cumbersome because it has this little attachment here that you had to plug in and put the battery in place. I just never liked this, it was just too much of a pain. It came from the original DJI FPV design, but yeah, the battery design is much better in here.

DJI Avata 2 Thrust Ratio and Endurance
Now we talked about the propellers, let’s talk about the thrust ratio. We do a thrust ratio test. In this case, this has a ratio of 3.39 to 1, meaning that it has the ability to lift its own weight by a factor of 3.39. This was interestingly almost exactly the same as what we had on the Avata, 3.38. Now because of the margin of error, I’m going to say they’re exactly the same with the testing that we do.

We also do testing on endurance, how long is this battery going to be good for? Well, advertised it’s 21 minutes at hover and 23 minutes in flight. The hover time is always less. We do hover time right here on this cyclo and we do do it in a tested environment so that we have the same results that we can compare.
Hover time was 19.08, so 2 minutes short of the advertised time, but keep in mind we do this at high altitude. The equivalent altitude at the time of this testing with the pressure and the temperature was about 6,000 ft elevation, so it’s normal that we get less than the advertised time. 19 actually out of 21 is a really good time, so the battery is much better in this drone, lasts a little bit longer than it did on the Avata.
Usually we talk about the low battery warning and when we get it. In this case, we did not get a battery warning. This was not an error, this is because when we do the testing in here, we test it if the battery goes bad, we don’t RTH, we actually have it hover. This is because we’re inside of a building, so it’s normal that we did not get a low battery warning.
Although interestingly, with all the other drones that we test, we always get that low battery warning. We did get a critical low battery warning at 17 minutes and 41 seconds where it activates landing, and then forced landing came in a little bit later at 19:04, and then it lasted about 4 seconds to land until 19:08, which was the final time in flight.
Noise Levels of the Avata 2
I did mention the noise and let’s get some numbers. 81 dB from 1 foot away and 74 dB from 5 feet away.

The original Avata was 94 dB from 1 foot away, so this is a reduction of 13 dB which is huge if you understand dB. This is a massive number. And then 81 dB from 5 feet away, so this is 7 dB less noisy from 5 feet away. Big difference, you’ll definitely notice it when you start to fly it.

DJI Goggles 3
Let’s go ahead and talk about these goggles, brand new goggles from DJI, a slightly different design. You notice that now we have the battery located in the back of the headset which is really cool, but you also notice where the straps attach and this is important. Because when the straps attached right here, what happens is you get a lot of pressure either on the bridge of the nose right here or usually like right here underneath the eyes.

And with this new design right here, they’ve actually attached the straps right at the top of this thing that can actually move. I do wear a lot of VR goggles because we do a lot of VR products for the company and I have to say this is better, but also because it’s lighter. This is a very light headset compared to VR goggles, but you’ll hear some of my thoughts in this video because I do wear a lot of VR. So keep that in mind, if you don’t wear VR, your experience might be totally different.
Speaking of VR, we don’t have VR in here, virtual reality, but we do have AR functionalities, augmented reality. So there’s the ability for these goggles to have a pass-through, which means what it has, two cameras right here in the front of the goggles, and what it does is well, it allows to send that information straight through, AKA pass-through, to the screens in the back right here.
So what it means is if you double tap right here on the side of the goggles or if you’re using this controller, which we haven’t talked about yet, but if you double click on this button on the wheel right here, if you double click on it, it will turn into pass-through, which means that you can look around yourself as you’re doing it.
I think eventually we will see these goggles being more like VR goggles where you have a full pass-through with the entire environment and seeing a full screen, which would be really cool. But at the moment it’s not, but this is the first version for DJI doing this, so I think we’ll see a lot of interesting upgrades.

DJI RC Motion Controller
Also, I do need to mention this controller right here. If you’ve ever used VR goggles with a controller, you know that there is an imaginary beam that goes at the end of this that you can use to select things on your screen and clicking.
Well, this does the same thing and I love that quite frankly. You know, instead of going up here touching this 4D button to select, going down, going up, going left, going right to go into the menus, you can now do this with this. You can click on the menu, you can scroll down and up using this wheel right here, and then you can select all the different options just like you would in VR goggles. The cool thing too is that this right here, you see this amount of movement, this is how much you need to select something.

Also cool in here that we got from the old goggles is the adjustable diopter, so you can adjust the width of your eyes. And then also inside here, you’ll notice there is a 0, -2, -4, -6. This is to adjust for your vision, so if you have issues with your vision and you wear glasses, corrective lenses, then you’ll be able to replicate this in here. And then they put the SD card slot right here on the inside in the middle, which is cool because it’s kind of protected.
Another thing that I like is the power button down here to turn on and off the goggles instead of turning it on and off from the battery in itself. Now, a bit of a downside that I want to mention is that this battery right here is fixed, so you’re going to have to charge it, which is done via the goggles themselves, not via the battery. So this doesn’t have a USB slot anywhere or USB plug, it’s right here in the goggles.

You notice this knob in the back, this is to change the tension on this spring. So you would put them on like this and then simply do the tension, and then you can adjust. I’m going to do it kind of, you know, more than you would, but you would adjust the goggles so they get closer to you. So you can move this inside and it’s a nice and snug fit with almost no light coming in. So that’s a big plus, not that these were bad.
As far as the battery in this, 3 hours of battery life, which should be plenty of time for you to get uncomfortable and want to take a break. So you can’t recharge them. Now you might be wondering, what about the quality of the image? It’s top-notch, I’m not going to lie. The image in here is really, really sharp with the fact that you can move these little diopters at the bottom and move them left and right for the width of your eyes. Super crisp the whole time, not a whole ton of field of view like I mentioned, but holy smokes, the image quality in here is just great.
Even when we did the testing beyond-visual-line-of-sight (BVLOS), the image quality, even when I was getting like 10 megabits per second or even sometimes single digit megabits per second into here, the image was still really crisp. I mean, for a digital system, just absolutely amazing.
Using the Motion Controller
Alright, well I’ve kind of talked about this, let’s talk about the controller. This is the new motion controller and it looks a little bit different – it’s darker than the original one. The slight difference in design is that we have a wheel on the side and then you notice this thing protruding in the front which we don’t have on the original. The reason it’s here is because you can squeeze your finger and you can go backwards. When you go up, the drone goes backwards. When you push forward, the drone is going to go forward.
If you’ve never used this before, when you put on the goggles and you have this linked, there’s going to be a dot on the inside of the goggles. The dot is the direction where the drone is going to go and this controller controls where the dot is. If you want to pitch up, you just pitch up on the controller and the dot is going to go up. You give it some gas and the drone is going to go in that direction. If you want to go to the left, then you’re going to be rolling to the left which is going to yaw the drone (which I hate by the way). To me, a yaw is this, so if I wanted to yaw the drone then I would do this. It’s not what it does – if you do this then it’s going to yaw the drone. There’s no real way to roll the drone.
4D Button
Another big thing is this 4D button – 4D as in 1, 2, 3, 4 – four dimensions. There’s no click so it’s not a 5D button, but this allows you to control the drone when it’s hovering. If the drone is hovering and I’m going to move this up, then the drone is going to climb. If I move this down, the drone is going to descend.
In the old controller, to descend you had to look down and orient this down, then push and the drone would go down. To go up, you would orient it up like this and the drone would go up. You couldn’t go backwards unless you had the head tracking on, so you would turn your head and then you would go forward. It was a big mess.
This new controller allows you to go up, go down, go forward, and go back. This also allows you to go left and right.
Landing and Other Controls
To do landing, it’s super easy with this controller. You would just basically come down, bring this down, the drone would come to hover, and then eventually would land. We still have that big red button here which we also had on the original controller. It’s got a special texture to it. This is how you spin the motors to get started – double tap and the motors are going to spin, tap and hold and the drone is going to take off, tap and hold and the drone is going to land.
We have our home button and mode button in here. In flight, if you hold it, it’s going to come back home. If you just tap, you’re going to switch between sport mode and the regular normal mode. The recording button is on the side.
The wheel is going to allow you to pitch the camera up and down. I didn’t really mention much about the camera just yet, but this is only stabilized under one angle, it’s only stabilized in this position, but you can move the camera up and down if you wanted to. I’ll have more info on that.
Quick Modes
There’s a quick mode on the inside where you can do some flips and that’s brand new. You’ll be able to select what you want to do. You can do a full flip in this direction left or right. You can do a full forward flip like this – it happens very quickly. Or you can do a forward flip like this.
There’s also a mode where you can go in this direction and the drone will flip over 180° and keep going backwards. So if you had an object that you were looking at and you went right past it and you wanted to stay on it and go backwards, pushing right here as you continue, the drone is going to go forward, flip over, and if you continue to push, it’s going to go backwards. If you let go and push again then it’s going to go forward.
I know it might be gimmicky for people that fly FPV, real full manual FPVs, but for those that are just getting started I think it’s just a cool feature.
Head Tracking
One of the features that we kept from the original Avata is the head tracking. You can turn head tracking on which means that as you move your head, the camera and the drone itself is going to move. If I move my head up and down then the camera is going to move up and down. If I move my head left and right, the drone is going to move left and right.
This is good when you want to do more advanced movement. I still find it very difficult to use when I use the motion controller, I don’t know why, but it’s also only available with this motion controller. If you use the other controller, there’s no head tracking available.
New FPV Transmitter: DJI Remote Controller 3
There’s also a new FPV transmitter – this is the Remote Controller 3. Really not a whole lot of difference, the only thing is the different antenna. This is the original one, or actually the version two that had that big flipping antenna up here, and this doesn’t have it.
Otherwise all the buttons are pretty much the same. You still have the ability to set this up to be in actual FPV mode where you can have it stuck in one position. In FPV, you’re going to start down here and then give it some throttle.
This mode is more set up for an FPV drone at the moment. You can also change these sticks, they also go on the inside. Other than that, really nothing has changed here. Obviously it’s OcuSync 4 now which makes it go a little bit further.

Full Manual Mode
I do need to mention, if you want to go full manual mode, this is the only way to do it. The motion controller only has sport mode and normal mode. This has sport mode, normal mode, and also full manual mode which you will have to go and set up inside of the menu. There’s a couple things you need to do just like for the original controller.
What I like about this is it has the “oh crap” button right here, I call it, which is the start and stop. If you get into FPV mode and you get into a position where you can’t recover, just push that and the drone will go into GPS mode, full altitude hold, and more than likely save your bacon.
DJI Avata 2 Camera Specs
Let’s go ahead and talk about the DJI Avata 2 camera. I know this is why you bought this drone – you want to get some cool footage, right? It’s got a new sensor, 1 over 1.3″ CMOS sensor, f/2.8 aperture, 12 megapixel, and it’s got a 155° ultra-wide angle lens, which is what you want typically for an FPV drone.

As far as videos, you have MPEG-4 as a format, 130 megabits per second which is really good, standard and D-Log M so you have the ability to do footage in log if you want to which is really high quality. We’re going to show you footage in a second. It does 4K 60 frames per second, 2.7K 120, and then 1080p at 120 frames per second.
Keep in mind we always get these drones early from DJI and from time to time they make changes to the image resolution, so with a software update they could increase that. It’s happened before, but at the time as we’re getting this drone, this is how the specs are.
Gimbal and Stabilization
As far as the gimbal, you notice that this gimbal is only stabilized over one axis. The rest of it is done with electronic image stabilization. It has RockSteady for stabilization, which is an EIS (electronic image stabilization) system which does it in post and does a really good job at it. It also has what’s called HorizonSteady, which is going to keep the horizon level on the drone.
ND Filters
I do need to mention these ND Filters which came with the kit. I don’t know yet what they’re going to be available with, what kind of bundle you get, but they’re slightly different than they were on the original Avata where you had to kind of squeeze it in there like you did with the DJI FPV. These you squeeze on the edges and kind of put it in place. Let me do this in front of the camera – if we hold it right here at the top and then you click it at the bottom and then you squeeze, remove them from the top or from the bottom and then they come off. Great design, I love that they were able to do this without having to screw anything in.
Image Quality Comparison
You might be wondering about the image quality for this. We did too. I know a lot of you like to fly with other cameras on top of your FPV drone like the GoPro Hero 10 Bones. We also have the Go3 from Insta360, which is a very lightweight camera that you would put on something this size. And then also we tested it against the Avata 1. The best way for me to talk about this is to have you watch this video right here of the comparison.
What I found from this camera is that the dynamic range of the camera is a lot better than it used to be. I think very clean footage coming out of this.

As far as photos, it also has a photo mode. I would say be careful with that – it’s not a camera drone really as far as photos. ISO 100 to 25600, that’s a very high range of ISO where the pictures are not all that great. Shutter speed between 1/8000 and 1 second, and then a field of view of 155 degrees. The equivalent focal length is 12mm, so very very wide, which is one of the reasons why this is not really a photo drone. Also, you only have JPEG available for the format, so keep that in mind.
Avata 2 Safety Features
This drone has quite a few features as far as safety, not as much as you would find in probably a more expensive and let’s say more “fancy” drone. The Avata 2 is an FPV drone, but it does have emergency braking when you press the pause button, the “oh crap” button that I mentioned before.
It also has RTH (return-to-home) because it’s a GPS drone, so if something happens the drone is going to come back. And then it’s got takeoff and landing assistance, especially if you’re using the motion controller, so you can easily take off and land without really doing much.

It’s got the home location as an augmented reality point on the heads-up display. So if you’re watching your footage as you’re flying around, you’ll see the home point is going to show up inside the footage very clearly as an augmented reality point that’s added right here in the footage.
As I mentioned before, as a safety feature, we have the pass-through function. If somebody comes and talks to you, you’ll be able to double tap on the side and then the image should switch.
Final Thoughts
Time for the final thoughts. I do want to mention one thing that happened to us and that I have verified with somebody else as well. If you fly this drone in a dark environment without GPS, the aircraft will switch automatically in these conditions from full GPS into manual mode or acro mode without telling you.

So keep that in mind, very very important. If you’re inside of a house for example, this could be something where you fly in GPS mode because you want to be super precise, and then all of a sudden it loses GPS, maybe it’s a darker environment, then it’s going to revert to acro.
A bit concerning, could be fixed with software. We’ll see if people complain about this and we’ll see if DJI actually responds. That’s one of the dislikes that I have and that’s really one of the only dislikes that I have about this drone.
We tried a lot of different things but it’s hard to not like it. I don’t think there’s many things in here that are not improved or not better than they were on the original. The goggles are much more comfortable to wear. I think it might be a personal thing, you might find them not as comfortable, I don’t know. I’ve seen a lot of VR goggles reviews where people say “oh this is not comfortable” and then I wear them and I’m like “this is not bad at all”. It’s also much quieter than the original, tons of improvement as far as aerodynamics. I’m going to say this is good. And then the dynamic range I think is also a big improvement on the camera in itself.

So I think overall the DJI Avata 2 is a pretty sweet little cinewhoop, extremely easy to fly. Even this motion controller, I think quite frankly my 5-year-old could probably put these on. I’m going to have to test it and when we’re done with the full testing maybe I’ll go to the park and see if he can fly it. But I think this makes it quite easy, quite intuitive for people that have never flown before. If you’ve flown before and you hate this thing, which some in our office don’t like it, use the traditional controller, which I think is a proven shape and form factor that they’ve used over the years.
I think this is great again for First Responders. We do have to take a look at this thing that I just mentioned about flying in the dark because this could be an issue for first responders that are flying in an attic or a place that’s very restrictive. But otherwise, the transmitter here is available separately as an extra purchase.
Let us know what you think in the comments, and we’ll see you in the next video.


+ There are no comments
Add yours