


Good day, folks! Shawn here from Air Photography. In this video, I’m going to show you how you can easily add ambient sound effects and music to your drone footage using free software called LightCut.
Now, LightCut, if you’re not quite aware, is DJI’s officially recommended video editing software when it comes to their devices. LightCut can connect to DJI devices wirelessly, so you don’t have to transfer the footage over to your iPad, iPhone, or Android device first.
You can edit directly off the memory card. It works for their DJI drones and their handheld devices such as the DJI Osmo Action, the DJI Osmo Pocket 3, and of course, the Osmo Mobile.
I’ve already made a full tutorial on LightCut on my channel back in the spring. Now, that video is a little outdated because they’ve made a lot of changes to it, including the feature we’re going to be diving into a little deeper today. It’s called AI Aerial Audio Match.
Basically, with AI Aerial Audio Match, it takes a look at your drone footage, automatically edits it for you into a nice, digestible clip, and matches it to appropriate music and ambient sound effects.
Those sound effects can really enhance the video, making it a bit more dynamic and cinematic to watch. You can let the software, the AI, do everything for you, or you can go in and adjust things further yourself if you prefer to do it manually.
Now, the Aerial Audio Match only supports drone footage. However, if you go in and edit manually, you can use footage from your DJI Action. You can browse their library, which actually has quite a huge selection of different ambient sounds, and you can manually add them to your handheld footage.
Let’s jump into the DJI LightCut App
With all that said, let’s just jump right in and take a look. As mentioned, it is free to download from the Google Play Store or you can download it on the Apple App Store. Now, if we were going to connect directly to the drones, we would use this button up here at the top.
You can see it’s listing my Mini 4 because I was previously connected to it. But for the sake of this video, I’m going to edit right off the iPad because I have most of the footage already copied over.
The feature we’re going to be looking at today is called Aerial Audio Match, and you can see it there at the top.
So, to get started, we’re going to click on that. Now, right now, it’s reading the Photos app, so the content that I currently have in my Photos app.
If we were connected to one of the drones, it would be listed there at the top, but we could switch back and forth. So, if you want to import media that you already have pre-shot, you can do both.
I’m going to go ahead here and select a few clips. So, we’ll start with this one, then we’ll do that one there, maybe that one, that one, and we’ll do that one there. So, I’ve got five clips selected, and then we just hit “Next.”
Now, at this point, it’s going to go through and analyze the footage to find the most appropriate theme music and sound effects. So, you can see it’s gone ahead and made us a little edit here, and it’s added some music and it’s added some sound effects.
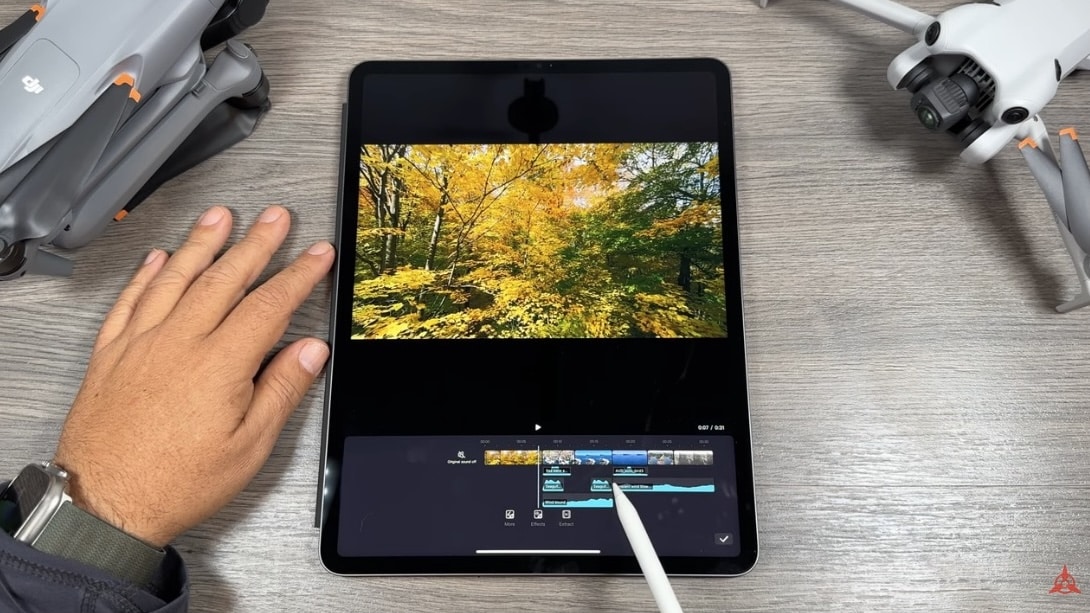
This blue track up here is the music, the background music it’s added, and these green little icons down here, those are all the different sound effects. So, let’s go ahead and see what it’s come up with.
So, not too bad! You can see it’s added some birds, some waves, seagulls, and some wind sounds. Now, we can adjust all of this. The first thing we can do is change the music.
If we select it, we can hit “Replace”, and that way, we can go through and pick something that we like better. So, we can preview them all, and if we like one, we can hit “Use”, and that’s going to replace that audio track.
And if we scroll down to the different audio effects, we can adjust them as well. We can delete one if we don’t like where they’ve put it, or we don’t want it in there.
We can grab the handles and change the length of it. We can actually move the whole sound effect to a different area. And we can add sound effects.
For example, at the beginning of this clip here, you can see we’re flying through some trees, and it goes right into the music. But what we can do here is make sure you don’t have anything selected, click on “Effects”.
That’s going to bring up their sound effects library. They’ve got quite a few, and it’s broken down by different categories, but we can actually search there. So, let’s type in “Wind” because I want to add maybe some wind noise as we’re flying through.
You can see it’s now listed all the wind, and we can preview them. So, I kind of like this one, “Windy Forest”. So, let’s hit “Use.” And you can see it’s added it in there at the bottom, but it’s taken up the whole track. We don’t want the whole track; we just want it for that first clip there.
While it’s selected, we can adjust the volume. You can see right now it’s at 100%. We can fade it in, we can fade it out, but let’s see what that sounds like.
So, you can see the music is very overpowering at the beginning. Let’s adjust that music so it doesn’t come in till right about there. And again, I’m going to hit the volume on that, and I’m going to make sure it fades in. So, now when we play it back, we should hear the wind, and then the music will fade in.
And at the end here, we have this train kind of going through the city, so let’s add some train sound effects there. We’ll go to “Effect”, type in “Train”, and search. We’ve got this one here, “Train Whistle”, so let’s hit “Use.”
So, you can just play around with the sound effects and the music until you get things the way you like it. When you’re done, we’ll just hit the check mark down there at the bottom right-hand side.
And at this point, we can go ahead and export it. You can export at 1080p, 4K. We can also change the format of it. So, if you need it in vertical format for something like YouTube Shorts, or you want it in horizontal because you’re just going to be uploading it as a regular video, you’re able to adjust it up there at the top.
And of course, lastly, if you really want to dive in and edit things yourself, kind of adjust it, you can do some manual editing. We can click that button there. We can adjust all the clips, or if we hit “Edit More”, you can see it kind of gives us a timeline, and again, we can go in, change some Filters, change the speed of the clips, do different things like that.
So, it’s a pretty powerful tool, especially if you just want something simple and easy. If you just want to upload a video to social media with some sound effects, then this is a great app to use. It’s free and it’s really easy to use.
Well, folks, hopefully you enjoyed this video and got some value out of it. Give it a thumbs up if you did; it’s always greatly appreciated. And we’ll see you in the next one.


+ There are no comments
Add yours