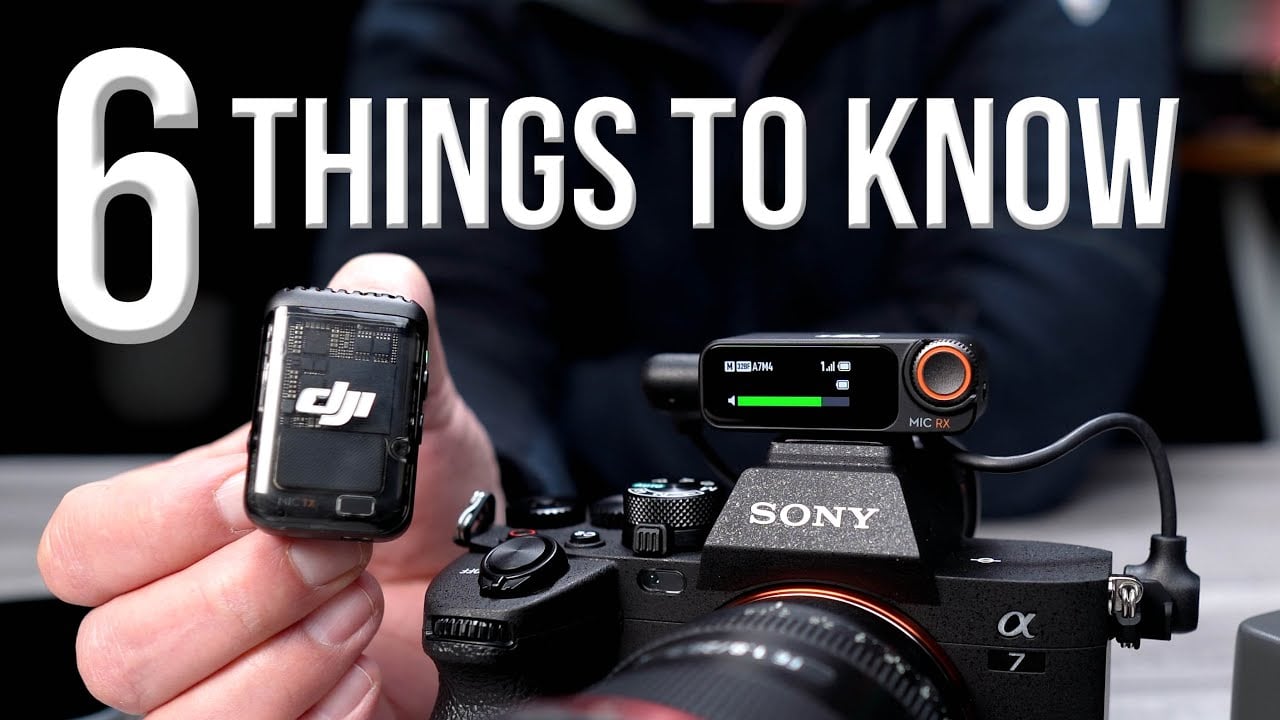
It’s somewhat difficult to explain, but when you first start making video content, whether it be for YouTube or for your professional career, you tend to focus on all the video aspects, especially if it’s all new to you. However, what most novice creators don’t realize is that the foundation of every good video lies in the audio. You cannot succeed in the world of content creation without including high-quality audio in your projects. People will quit watching a video that has poor audio quality way more often than if it has poor video quality. The DJI Mic 2 combines flexibility with ease of use and superior sound quality, which makes it an excellent choice for brand-new YouTubers as well as professional video producers. So, let’s throw some specs up on the screen for you to check out. Go ahead and pause this if you need to, and then I’ll tell you about the top six features of this pro microphone system that you really need to know before you decide if it’s for you.
DJI Mic 2 Video – The Wireless Microphone for Everyone
DJI Mic 2 – Noise-cancellation
Now, first of all, I do want to say that the original DJI Mic is great. I’ve used it in over 50 of my YouTube videos, and I only ever had just a couple of minor complaints about it, which the Mic 2 has now fixed. The first feature that I want to talk about today, and I think is the most important feature of the Mic 2, is the noise cancellation capabilities. In so many of my videos over the years, a big part of my editing workflow includes removing as much background noise as I can. I always have room tone like car noise in the background, HVAC noise if I’m in my house or somewhere else indoors, and I have to remove those things by using either a high-pass filter or an auto gate in the editing process, or something like that. But with the Mic 2, you can remove the background noise right in the recording. One of the most powerful features of the new DJI Mic 2 is the ability to cancel background noise. So, I brought you here to the group fitness room at my local YMCA because this room has some of the worst HVAC noise that I could find. It’s got two fans, an overhead, and some other piece of equipment humming over here in the corner. So what I’m going to do is just let you listen to this background noise, and then I’m going to turn on the noise cancellation and just listen to this difference. First, no noise cancellation, and now, with a simple tap of the button, you can remove all of that background noise. HVAC noise is one of the worst things to deal with when you’re making videos, and you can do that with the Mic 2. And the best thing about it: most of the time, noise cancellation causes your voice to be really tinny, almost like you’re talking into a tin can. The Mic 2 does not do that. My voice sounds normal to me right now. I don’t know if it does to you, but it really sounds a lot better to me. So, noise cancellation on the Mic 2 is very, very cool.
DJI Mic 2 – Signal Transmission
The second feature that really impresses me about the DJI Mic 2 is the signal transmission strength. DJI knows how to do signal strength, and they put their blue-ribbon recipe into the Mic 2. Okay, I just thought of another test that I want to do. The signal strength is supposed to reach up to 250 meters between the transmitter and the receiver with the Mic 2, but I want to try it through some walls, through some brick walls. So, I’m recording right now with my iPhone. I’m going to walk around and try to challenge this thing as much as I can. So, let’s go ahead and walk through the building and see if we lose audio signal. Let me turn this down first. There we go. Let’s head up through the stairwell. I’m going to put this on wide. There we go. Okay, so first, you know it’s going to reach here, right? So, there I am, second floor, pretty good. But was it able to hear me through the wall? I’m going to go around the back side of it right now. So, let’s walk around the track here. I’ll show you here on my iPhone. So, right there’s the brick wall, and you can see a little gap over there, a little space. It might be reaching through there. I don’t know, but I’m assuming you’re not able to hear me right now. But maybe. We’re going to come all the way around, and we’re just going to take a long lap. Alright, so let’s go ahead and talk here. Let’s see if you’re able to hear me. We have a brick wall right here, here’s some lockers. So, let’s go. Hey, good. Let’s go right back down the stairwell. So, here we go, coming back into view now, pretty quick. So, did that maintain signal strength? If it did, I’m very amazed. Very, very amazed. So that’s pretty impressive.
DJI Mic 2 – Design
Thirdly, the receiver is an amazing design. This was one of my complaints about the original Mic. I often had trouble navigating through the menu with the touchscreen, but now, with the control wheel and the click button on the Mic 2, I can more easily go through the menu system. It’s easier to navigate, and if you like using the touchscreen, you can still do that. But I really, really enjoy the tactile feel of this control wheel and the button. It just feels so much more natural to me.
DJI Mic 2 – 32-bit Float
Fourth, 32-bit float is the future of microphone systems. Now, if you already know what that is, just go ahead and skip ahead to the next part of the video. If you don’t, what it means is that this microphone captures more dynamic range. So, if something gets too loud suddenly, or maybe gets too soft while you’re recording, you can easily recover those in the editing process without distorting the audio at all. You know how a camera has dynamic range, like being able to capture the shadows and the highlights at the same time, then being able to fix that in post, and everything just looks beautiful? Well, 32-bit float captures more dynamic range in the world of audio, with more highs and lows, so you can eliminate clipping. Alright, just an example to show you what 32-bit float can do for you. Right now, I have it disabled on the transmitter. Let’s say you’re at a sporting event, someone scores a last-minute halftime shot, and the crowd goes wild, and your audio gets clipped, right? You try to turn it down, but even when you turn it down with your editing software, it’s still going to be clipped. It’s going to sound distorted and terrible. So, what I’m going to do now is enable the 32-bit float transmitter settings. 32-bit float, let’s turn it on. Oh, I have to turn this off first, and then um, I have to stop recording. There we go. Now I’m recording again, and now I have the 32-bit float. And let’s say it’s the end of the game, and someone scores a last-minute shot to win the game, and the crowd goes wild again. But this time, your audio is saved because you have 32-bit float turned on your DJI Mic 2. So, that’s what it can do for you. Now, one thing to remember is, if you have that turned on, you’re not going to get as much recording space on your onboard storage on your transmitter. You’re only going to get about 11 hours instead of 15 hours. So, you lose a little bit, but really, 11 hours is going to be plenty of recording time.
DJI Mic 2 – Battery Life
So, next, let’s talk about battery life. Another complaint that I had about the Mic 1 is battery life. There have been several times where I had to interrupt my recording process and charge my transmitter because it went dead, mostly because I forget to charge it when I’m done using it, but also, there were some times where I was using it for so long, it just wasn’t long enough, and it would die. The Mic 2 has a 6-hour operating time, which is an hour longer than the previous version. That may not sound like a whole lot, but that extra hour is huge. And also, one very useful feature that the Mic 2 has is the receiver power syncs with your camera. So when you turn off your camera, the Mic 2 receiver turns off as well, saving you battery life. It’s a minor feature, but it saves so much battery, especially for people like myself who forget to turn things off on a regular basis.
DJI Mic 2 – Bluetooth
Finally, Bluetooth. The Mic 2 has Bluetooth capability. The Mic 1 did not have that. So you can connect this to your phone, the Pocket 3, or the Osmo Action 4, without having to connect the transmitter. As far as Bluetooth pairing to your mobile device, to your phone, with the Mic 2, all you have to do is hold the record button for 3 seconds on the DJI Mic 2, and then what you’re going to do is see a blue blinking light. That means that it’s ready for Bluetooth. Then you open up your Bluetooth settings on your phone, and then on the other side of the Mic 2, you’re just going to hit the connection button, and you’re going to hold that for 2 seconds. Then what’s going to happen is that blue light’s going to blink fast, and then it should pop up on your Bluetooth available devices on your phone, and then you’re just going to go ahead and tap that, and then they’re connected. Now, it does not work with the native camera app, at least it doesn’t on the iPhone. I don’t know if it does on Android, but it does work with third-party apps like the Moment camera app. That works really well. There are some other ones out there that you can use. I think it works with just about every other third-party camera app, but it doesn’t work with the native camera app. So just keep that in mind. This feature is very welcome by on-the-go content creators, you know, people who do action sports or vlogging are going to love the Bluetooth capabilities of the Mic 2.

## Wrapping Up My DJI Mic 2 Review
Now, as I wrap up this video, there are a few other things that I want to mention. First of all, the build quality of this charge case is amazing. It’s almost like die-cast aluminum or something like that. It feels very, very professional, very well-built. So I do like that. The windscreen, the new design of the windscreen, is very, very soft, by the way, but it just plugs right into the 3.5 mm jack on the top. It’s so easy to install. You just pop it on, pop it off, just like that. Much better than the Mic 1, where you had to kind of get it just right and then twist it on there. You don’t have to do that with this one. You can just pop it right on there. On the back of each of the transmitters, it has the new magnet. The magnet is thicker, so it’s easier to take on and off. And also, each side of the magnet has a different design on it, so you can tell which transmitter you’re using, you know, if you have two people, two separate people you’re interviewing or whatever, and you forget which mic is which. You can turn those magnets around, and that’ll help identify which one is which. This does come with two adapters for your phone, USB-C connection or the lightning connection, so depending on what phone you have. And then finally, I have to mention this connection cable. It’s foldable, positionable. Okay, so you can put it into whatever position that you want to, and that can be very useful to get it out of your way when it’s on top of your camera. So that’s just a really nice feature. They just put a little added formable wire in there, so you can make this however you want it to be, and it’ll stay in that position. So yeah, very cool. Just little minor design features, but they really make it so much better than the original version.
I’ll have a link in the video description for you to learn more about the DJI Mic 2, or if you want to purchase it. Post your questions in the comments down below, and I’ll answer the ones that I can. I want to thank DJI once again for sponsoring this video. Have a great day, and we’ll see you next time.









+ There are no comments
Add yours