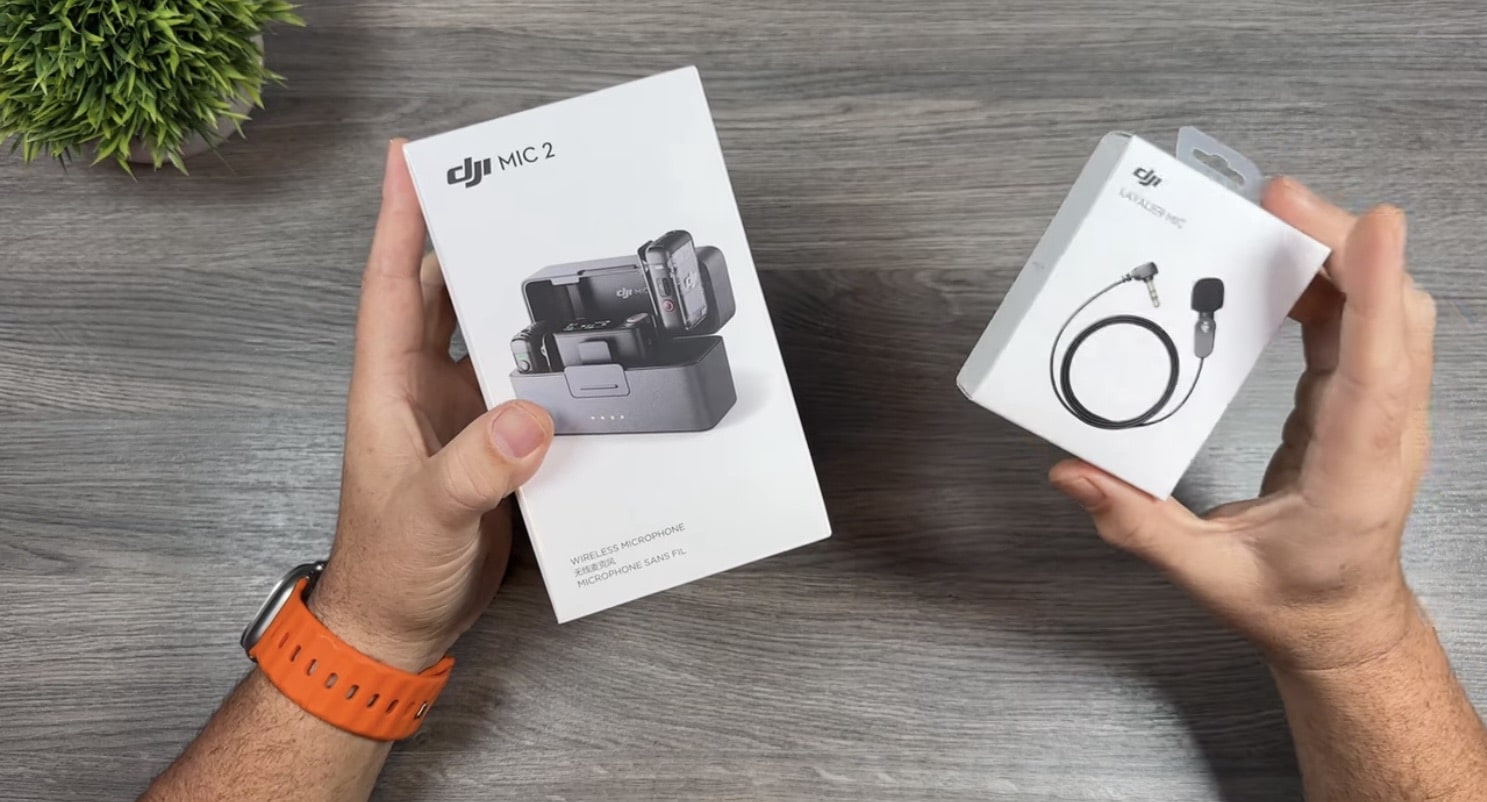
Good day, folks. Shawn here from Air Photography. DJI has recently launched a brand new microphone system, simply called the DJI Mic 2, and they’ve also launched a brand new Lavalier mic.
So in today’s video, we’re just going to take a look at it, unbox it, see what all comes inside the package, and talk about everything that’s new.
DJI Mic 2 Video
Now, there are a lot of new enhancements with this microphone system, and whether it’s worthwhile upgrading if you already own the original mic system is going to be up to each individual.
Some really nice new features, however, include longer battery life, now rated for a total of 18 hours compared to 15 hours, and it has intelligent noise cancelling, which can be easily turned on and off just by simply pressing a button on the transmitter or changing it in the settings as well.
But the nice thing about that is you can just turn it on on the fly, even while you’re already recording. It’s also got 32-bit float audio, which is going to be really important for some people, and a whole bunch of other little feature and design enhancements.
Unboxing the DJI Mic 2
So, let’s just open it up here, and we’ll take a quick look inside. In that box, we get a little information package that comes with a quick start guide.
The first thing you’ll notice right away is it comes with this nice new case, compared to the original microphone system that just came with a pouch. For the most part, this pouch worked just fine.
The only thing I didn’t like about it is that the top never really completely closed. I was always worried I was going to lose some of the little components inside there.
The only downfall is that it does take up a little bit more room; it’s a little bit bulkier, but not by much. So let’s go ahead, and we’ll take a look at everything that comes inside.

You can see we have the new battery charging case there, and everything’s inside, which we’ll open up here in a minute. We have a TRS to TRS cable, so this can be connected to different types of cameras, including GoPros, if you’re using something like the media mod.
We have USB-C to USB-A for charging and also for updating firmware. Then we have the newly designed wind screens. If you’re going to be filming outside on a windy day, personally, myself, I always just have these attached.
I find it can help prevent popping if you happen to talk right directly into it. And that’s everything that comes inside the case.
Before we open it up and take a look inside, you can see that there is a slight size difference. It’s not overly drastic. Weightwise, you know, it might be a little heavier, but in the hand, you can’t really notice any difference weight-wise, but just slightly bigger.
You can see it is a little bit longer there. It does have a much more premium feel. I’m not sure what kind of material that is. It almost feels like metal, but I don’t know if it is. I think it’s plastic, but it almost has like an aluminum feel to it.
The other thing you’re going to notice straight away is that we have a locking button right there on the front, whereas the original microphone system didn’t have that. You see this one here won’t accidentally open up; you actually have to press the button, and then it will open up.
And just like the original microphone system, one nice feature of it is, as soon as you open it, it’s going to go ahead and power all the devices on, which is super convenient.
Now we kind of already got a little bit of a preview of the DJI Mic 2 with the Pocket 3. If you ordered the creator combo, you actually got one of the transmitters, and it’s actually a really good sounding microphone system.
And the beautiful thing about these new transmitters is that they can connect directly to certain devices via Bluetooth, and that now includes smartphones and, of course, the Action 4. And that’s actually huge because now you can order these separately.
So if you want to order one of the Mic 2 transmitters just to connect to your Action 4, you can buy it separately for, like, I think it’s like $99. You don’t need any transmitter; you can just connect it directly, and it actually sounds really good.

In fact, the last couple of videos that I uploaded, there was one for an e-bike and, most recently, the one that I uploaded about flying drones in the winter, they were all recorded on the DJI Action 4 with the DJI Mic 2 connected to it. No cables, no receivers, and it’s just so convenient.
You just power it on, and it automatically connects. You don’t have to worry about plugging in any cables or receivers, taking doors off; it just works really, really nice. So that’s going to be a game-changer for a lot of people, especially if you do a lot of vlogging.
You can have this inside your helmet, no having to worry about cables or making your camera not waterproof anymore, just a really nice little setup.
So, if you do upgrade to the new system, you can actually add a second microphone connected to your Pocket 3 as well. So you can see the new transmitter; it’s a little bit differently shaped. Generally around the same size but a nice new sleek design.
I actually really like that, and a couple of really interesting changes that they’ve done here is the cold shoe is now built directly into it. With this one, you either had to have one of the adapters plugged in.
If you didn’t want that, then you had this clip you had to attach, which was, you know, kind of a pain, especially for somebody like me. I’m filming between a smartphone and an action camera all the time, and I was constantly having to take that on and off if I was going to clip it to a GoPro and then put it back to a smartphone.
So having the cold shoe always there, you can still just remove that little plate there and then attach your smartphone adapter. And the thing I noticed right away there is that that’s actually locked in quite a bit. I have no worry that that’s going to even pop out.
That was an issue that I’ve had quite a bit with this one. When you go to plug this into a smartphone, I’ll just actually show you here, depending on how you put it in, you can see how you can actually accidentally uncouple it.
And there was a couple of times this summer I recorded whole videos, like 40 minutes, half an hour, only to find out it wasn’t connected. And yeah, you know, that’s obviously a problem. So this new design is so much better. I’m putting a good significant amount of force on that, and it’s not coming undone. You have to really push on it to get it to pop out.
So that’s actually a really great new design improvement. And, of course, there’s a USB-C adapter as well, so you can use that to connect directly to your Action 4, a laptop, an iPad, anything that takes USB-C. Now, if we take a look at the transmitters and compare them, they’re very similar in shape and size.
Of course, there’s a new design to this one, with more of a transparent look, which actually I kind of like. As you can see, the button configuration is a little bit different, but overall, there are some really nice design changes, especially how they’ve got that red button there for recording.
On this one here, it was just labeled ‘record,’ and you really had to look at it to make sure you were pressing the right button if you wanted to do some recording. On this one, you know right away it’s a red button, which usually signifies ‘record.’
Now, as mentioned, these new transmitters are capable of 32-bit float recording. Now, that 32-bit float isn’t baked into your video if you have this attached to a camera. Basically, that’s going to be for the backup recording, and all that does is it’s kind of like a raw audio file.
If you have audio that’s clipping or too low, you can make some adjustments when you’re editing without actually ruining the quality. So it’s not something that everybody’s going to use, but it’s just nice to have that backup if you need it.
Of course, we’ve got these newly designed wind covers, which are super important for when you’re recording outdoors, and they’re just nice and easily attached, compared to the old transmitters, where you had to kind of line up those little notches.
That was kind of a pain to do, especially if you were filming outdoors on a cold day, and your hands are cold, trying to get everything lined up was kind of inconvenient. Whereas this new setup is really nice.
Now, on the transmitter here, we get some new design changes as well. First of all, you can see we have this new dial, and that can be used if you’re in your settings, you can kind of scroll through things.
But more importantly, it allows you to go in by pressing it, and you can adjust the gain of the receiver here, press it again, and it’s going to go down to the transmitter, and adjust the gain of the transmitter. If we had both transmitters connected, we could press it a third time, and it would adjust that other transmitter as well.
We have a larger screen here. I believe the other one was .95 of an inch, and this one here is 1.1 in, so just slightly bigger. But, of course, when you have a screen that small, any little size improvement is important.
With the transmitters, you can also get this in a white version. So if that’s something you prefer, now you can’t buy that as a whole kit, I don’t believe. I believe it’s just if you’re ordering the transmitter separately, you can get it in this black or gray color, or in white. So it just really depends on what you prefer.
Now, I’m going to put the smartphone adapter back on here because they actually have a nice feature. So, if we have it plugged into our smartphone, we can actually plug it into USB-C, and what that’s going to do is it’s going to charge the receiver at the same time but also charge the phone.
So it’s got that nice pass-through, and you can do that for your action camera as well. If you’re using the Action 4 and you’ve got the receiver attached to it, you can plug in USB-C. That’s going to charge the receiver, but it’s also going to charge your Action 4.
Lastly, let’s go ahead and take a quick look at their new lavalier that they’ve launched alongside it. Now, this is compatible with any type of microphone system, so it’s not necessarily just for the Mic 2. If you have the original microphone system, it’ll work just fine with it as well.
Lavaliers are handy because, you know, you can do a little bit more with them. They can be a little bit more discreet, and in some circumstances, you can get better sound out of them. To use the lavalier, you just plug it in at the top there, just like that.
You can put this in a pocket or pin it on the inside of a jacket, and then you just attach that to your collar or shirt.
So right now, if we have this connected to a phone or a camera, and we’re recording, it’s just recording the default audio. But we can just do a quick press on the power button, and you can see we now get that little icon on the screen there.
I don’t know if you can see that, but that means that noise reduction is now enabled. We can simply turn it off again just by pressing the power button quickly. The other thing you’ll notice is that the light there changes to more of a yellow color.
But the nice thing about that is you can enable that on the fly. So if you’re outdoors recording and you’re in a fairly quiet environment, and you don’t need that on, you can just be recording away.
Then if the environment suddenly gets a little bit noisy for a few minutes, you can just simply enable it, continue recording, and then turn it off if you don’t need it again.
The nice thing about that is, usually, when you have that kind of noise reduction, it can distort the audio a bit, so you don’t really want to have it on unless you absolutely need to. So there, you can just turn it on and off as needed.
So definitely a really nice feature. And one nice little feature you can see here: when we start recording, if we’re going to be recording to the transmitter and we just press the record button, you can see we get this nice big visual representation there that it is recording.
We get this big red box around it. When we stop recording, that turns off. And I’m going to turn the other receiver on too. I’ll show you how that works.
Now, you can see we have both receivers on. If I start recording on this one, you can see that the red box just appears around the one that it’s recording to. Again, I can turn this one on as well, and now we have two red boxes. So just some really nice new design changes that make it a little bit more intuitive and a little bit easier to use.
Well, folks, that’s basically it for this video, just kind of going over what’s new. Now, this video isn’t a review. I am going to be doing a full review of this once I’ve had a good amount of time to use it, so stay tuned for that.
Thanks a lot for watching this video, and we’ll see you in the next one. Bye.








+ There are no comments
Add yours