


What’s up guys, welcome back to another video. Today it’s an exciting one as we’ll take a first look and unbox the brand new Hover Air X1 Pro Max. So let’s open the box up and I’ll talk you through the things as I go. I’m curious to see what we have inside and of course I’m curious to see how this drone will operate, how it will be for flying.

Box Contents
I think I need to do this… So we have a beacon and joystick bundle here, a power case here, the drone itself which we’ll get to in a second, and let’s see what we have here… Seems like a bag for carrying the drone. We’ll get to that later.
The Drone
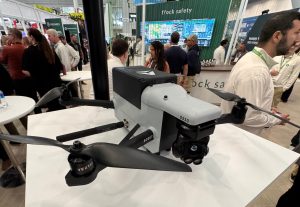
So let’s open up the box of the drone first as I’m really curious about that. As you can see, it’s the Pro Max version by this gold label here that says Max. This is the actual version that shoots 8K, and they have a regular version that shoots 4K. So this is the better version, if I can say that, at least on paper.
Let’s check it out. It is very nice packaging, I have to say. So we have this case here which I’m a big fan of, these cases that the drone comes in with. So that will be nice for protection and for carrying.
“Please read before your first flight” – I will promise. We have some paperwork here, quick start guide, and I like to keep those unopened. What is that? It’s just a cloth to maybe keep some of the accessories inside, I don’t know. And we have some cables I assume here, USB-C to USB-C.
So let’s open up the drone, and here it is. More paperwork here. We have the drone itself. Opens up really nicely and it’s really, really tiny. I have to say, it’s crazy how this thing folds up and it’s really small.
Comparison with Neo
Quick comparison straight away with the Neo because I’m sure many people will be curious about that. So here it is, not that much bigger, but of course this has the huge advantage of folding up and being able to be put back into your… even your pocket if you have a big jacket, for example. You’ll be able to put it there.
Charger and Batteries
Then we have this charger which also holds one battery if I’m not mistaken. So we already have one battery here and the other one can be put here. This is the charger which can be charged via a USB-C cable, and this is the charging brick, 65 watt, which unfortunately comes with the US extension. So I’ll have to figure out and buy a separate plug for this so I can actually use it for European sockets, which I don’t know why they don’t have the European version, but it is what it is, I guess.
Power Case
Now let’s check out the power case. So again, we have some very high quality material. I like the finish of this, feels like leather, and we have this magnetic latch here which opens up. We have a shoulder strap here and some more paperwork. I’m not sure how much paperwork is needed for this drone, why does it have that many booklets?
But this is the case which I assume the drone goes here somewhere. Yes, that’s right. Close it, and I assume it should start charging. So this is the carrying case which charges the drone as you go, really cool to have as you don’t really have to worry about charging that way and it acts like a giant power bank.
Beacon and Joystick Bundle
And now let’s see this beacon and joystick bundle. So this is really cool if you want to use this drone in a standard way with the remote controller, with your phone, and with this beacon which can also be used for the tracking functionality of this drone.
Again, very nice case here. They’ve done a really, really good job, very solid job of providing some quality cases and materials for all of their accessories. Very, very nice to see that. That makes a huge impression to me, great first impression.
Here we have one side of the remote, another side of the remote, and the beacon itself. I always make such a big mess when I unbox anything in my studio, but that’s how things are. And here we have the control sticks, more paperwork, and more cables. So we have a hand strap, USB-C cable to… to this. So that’s for charging the remote, I guess. And we have some cables to connect to your phone. So we have left and right side, and then we have the beacon.
Okay, so right… So it’s just really, really easy to put it magnetically and then you just twist those sides here. And this is kind of like your phone holder, you can open it up and put your phone inside. A little bit flimsy, I would say, first impression. A little bit flimsy but it does the job, I guess. Pretty good.
So it’s really easy to put it together. All you need to do is just latch it via the magnets here until it clicks, then you twist those arms and this is your remote. From here on you can just attach your phone, download the app, and start flying with this remote. At the same time using the beacon, which is your point of connectivity to the drone.
So this will keep the drone following this beacon, which is really nice as it’s not going to just rely on the visual side of things to keep you tracked, but it will track the beacon itself, which is really handy if you’re on a bike or on something that you know is moving around the area a little bit faster and is going through different obstacles.
Additional Accessories
So this shoulder bag, or just this bag, I want to check it out real quick, see if we have anything inside. Seems we don’t have… Well actually, we do. We have another shoulder strap and we have some more things here. Wow, okay. So we have ND Filters. I did not know that this comes with ND filters, so we’ll open that real quick. Handlebar mount, okay, perfect for biking. And we have a magnetic adapter mount and magnetic clip for the beacon.
Let’s open up the handlebar mount. So we have the regular screw and this… Okay, this is just a rubbery mount that goes over the handlebar. You can just use this to strap it to your handlebar and then attach your beacon here. And let’s see if that’s the attachment for the beacon. So many things here.
And finally we have this little box with the ND filters, which I’m curious to see how they look. They even come with this little cloth. So we have ND8, ND16 – is it right? It should be 16. Looks like a 5 to me, but okay, it should be 16 – ND32, and ND64. They look great, and I assume they are magnetic or something like that. Maybe… maybe not, I don’t know.
We’ll see how they attach to the drone itself, but they look great, and I like the case. A very recurring theme here – I like the accessories, I like the cases, they look great, very high quality.
First impressions: HoverAir X1 Pro Max drone
So first impressions, I have to say, are very, very, very good. Now we only need to see how this drone flies so I can be sure that it’s a good product because from the packaging, it looks great. I have high expectations now from this accessory list and accessory package that comes with so many things inside.
So I’m very curious to see how this thing flies. Of course, stay tuned for an in-depth Review and a comparison with the Neo. Once again, here is the Neo, here is the Air Pro Max, the X1 Pro Max from Hover Air. This will be my first Hover Air product that I’m checking out, so I’m curious to see how this thing flies, how it handles tracking, how it records, because with this huge expectation of 8K camera, it should film pretty good, right? It has a nice big sensor here. So the sensor is equivalent of 16mm and it has a lens of f/2.55, so pretty good. So pretty good sensor size and lens aperture.
So we’ll see about that very soon. Stay tuned for my upcoming videos and of course make sure you’re subscribed to the channel so you don’t miss them when they come out. For now though, this is everything I have for you from today’s video. Thank you so much for watching this quick unboxing of the Hover Air X1 Pro Max.
This is Mike from Drone Supremacy. Take care and I’ll catch you in the next one.
Ciao!
Discover more from DroneXL.co
Subscribe to get the latest posts sent to your email.


+ There are no comments
Add yours